An AC recharge adds refrigerant back into the system when the charge has dropped too low to cool well. It is one of the few air conditioning jobs a careful owner can do in a driveway, and a can of refrigerant with a gauge costs far less than a shop visit. The catch is that it only treats a symptom.
Here is what most people get wrong: an AC system does not consume refrigerant the way an engine burns fuel. A sealed system that is low has a leak somewhere, however slow. Topping it up can restore cold air for a season, but the refrigerant will escape again, and chasing colder air by adding more to a system that is already full just overcharges it and makes the cooling worse.
Done carefully, a small R-134a top-up can be a reasonable driveway job on some older vehicles. Done by feel, with the wrong refrigerant, or on a system that has another fault, it can overcharge the system and damage the compressor.
Quick answer
A DIY recharge runs about $15 to $50 for a can with a trigger gauge and takes 20 to 40 minutes. A shop that evacuates and refills the system by weight commonly charges $150 to $300. Difficulty is moderate, mostly because it is easy to overcharge. The one thing you must not skip: connect only to the low-side port and stop at the pressure the gauge calls for, not when the air feels coldest.
AC recharge decision checklist
A recharge may make sense if:
- the system still cools a little;
- the car uses R-134a;
- the compressor engages;
- there is no obvious oily leak;
- you are doing a small top-up, not refilling an empty system.
Skip a DIY recharge if:
- the car uses R-1234yf;
- the system was opened for a repair;
- the compressor clutch does not engage;
- the gauge jumps into the red zone;
- cooling disappears again after days or weeks;
- the AC is warm at idle but cold while driving.
Why it matters
The compressor relies on refrigerant to carry its lubricating oil around the system. Run it badly low and the compressor starves for oil and wears out, which turns a $30 can into a repair that often passes $1,000. Overcharging is just as harmful: too much refrigerant raises high-side pressure, makes the compressor work harder, and pushes warm air from the vents instead of cold.
Sealant or “stop leak” cans cause their own trouble. They can clog the orifice tube and condenser, and they contaminate the recovery machine a shop would later connect, so many shops refuse to service a system that has had sealant in it.
Signs it’s due
- Cold air that fades. The AC blows cold on startup, then drifts toward cool or warm as the system runs.
- Cold only at speed. If the AC gets cold on the highway but warms up at idle or in traffic, check condenser airflow and cooling fan operation before adding refrigerant. Low charge can contribute, but airflow problems are often the first suspect.
- Rapid compressor clutch cycling. The clutch clicks on and off every few seconds because the low-pressure switch keeps tripping.
- Oily film at fittings. Refrigerant oil leaves a greasy, dust-caked residue at hose connections or the condenser, marking a leak.
- Recent open repair. A component was replaced and the system was opened, so it needs refilling by weight.
Pick the right refrigerant first
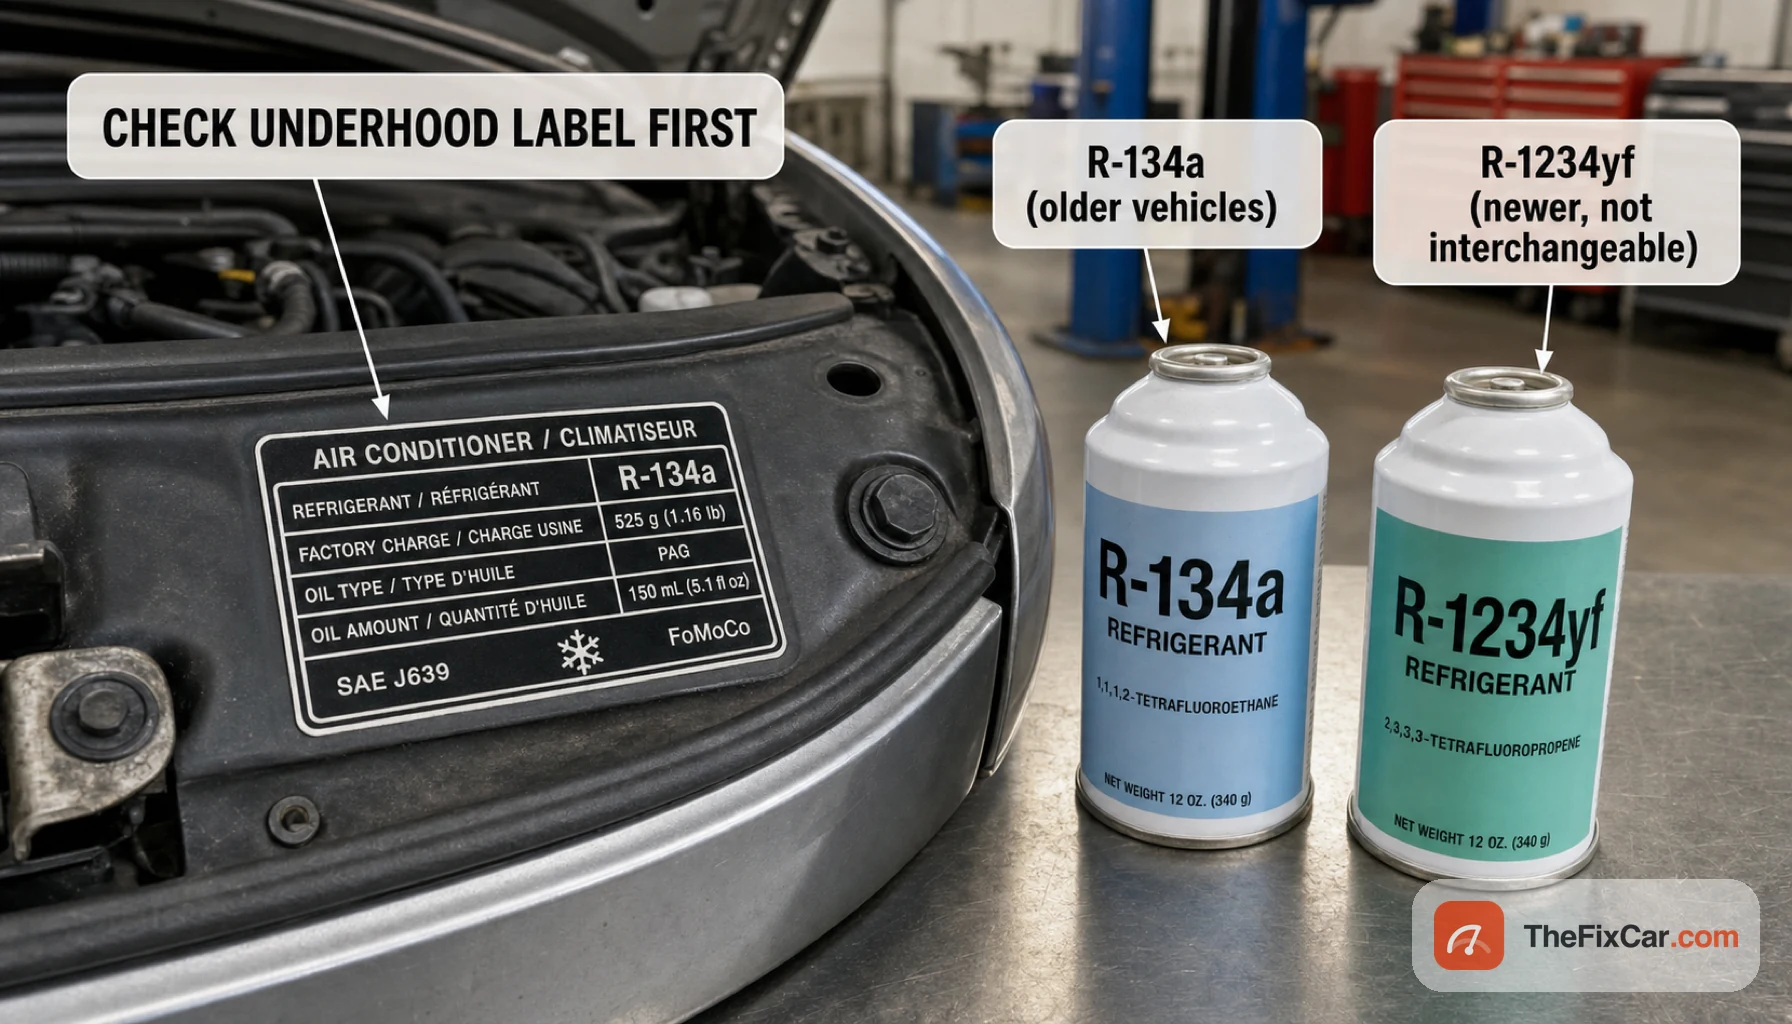
Check the underhood AC label before buying anything. Most vehicles built through roughly 2017 use R-134a; many built after use R-1234yf, which costs several times more and is mildly flammable. The two are not interchangeable, and the service ports are different sizes so the wrong can will not connect. R-1234yf work is where a lot of owners hand the job to a shop.
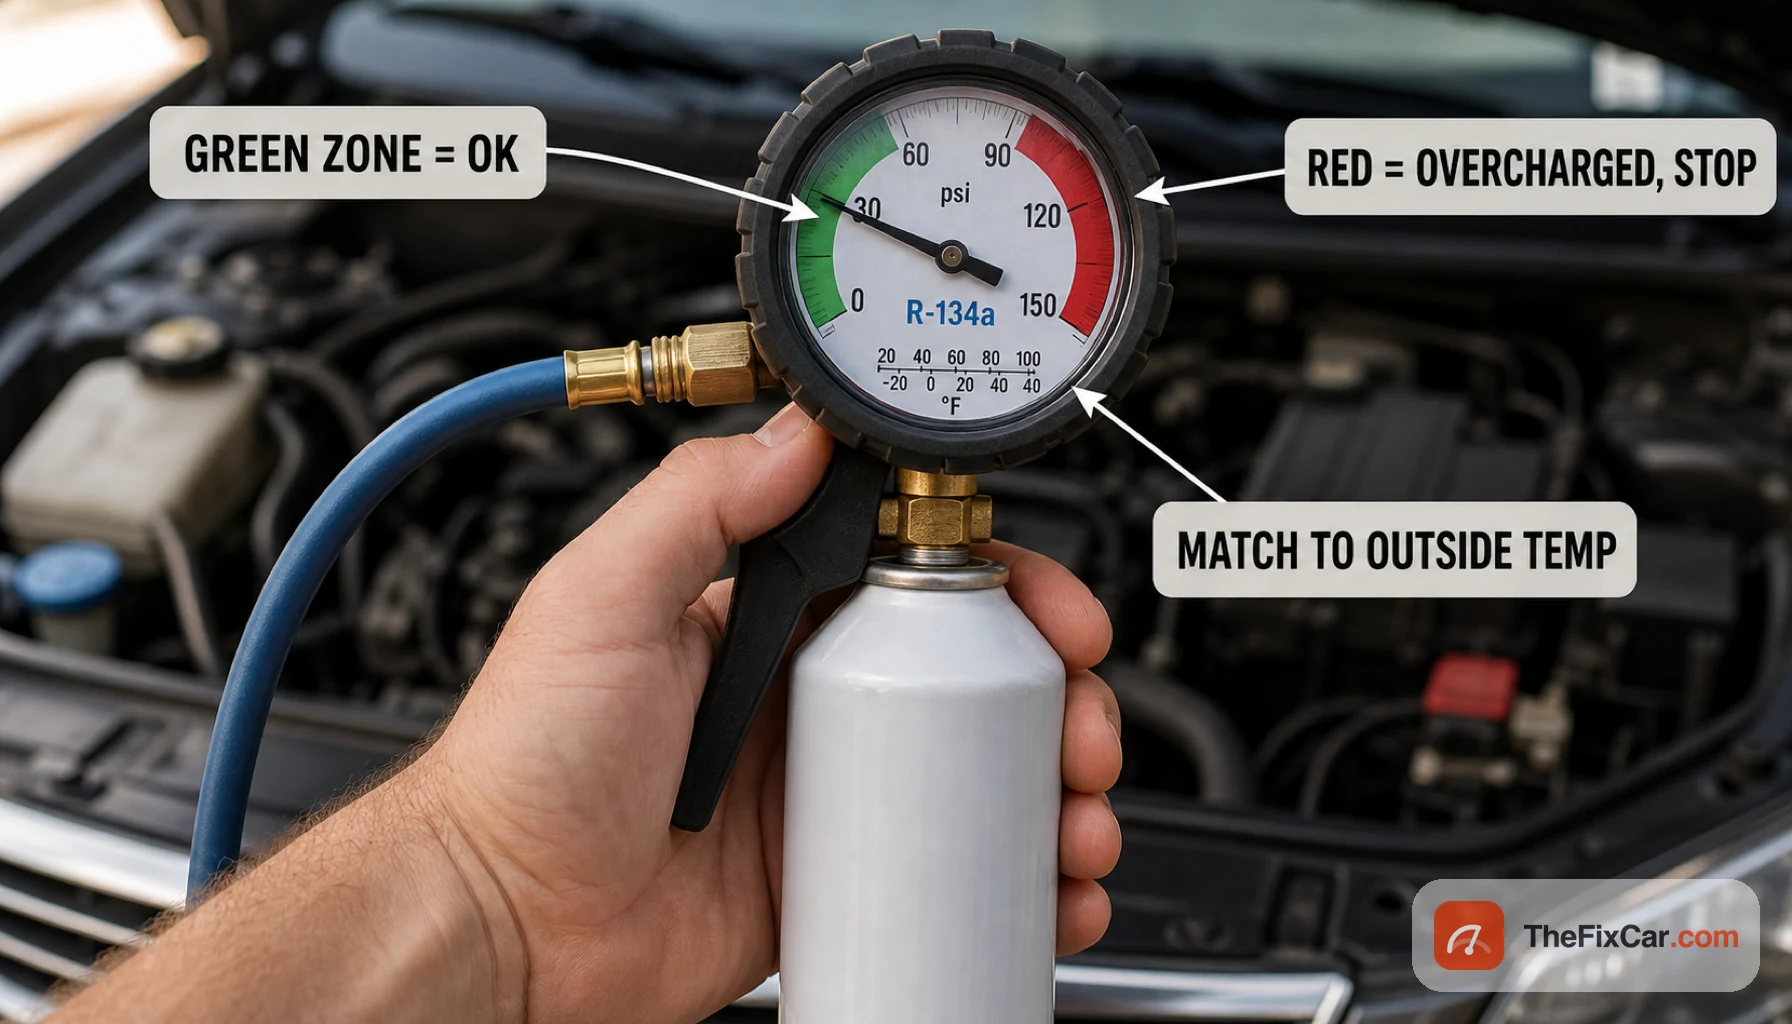
Target low-side pressure
Low-side pressure depends on the outside temperature, so read the gauge against the ambient air, not a single number. These are rough targets from published DIY pressure charts; your system’s correct figure can differ, so treat them as a guide, not a spec.
| Ambient temperature | Approx. low-side target (R-134a) |
|---|---|
| 65°F | 25 to 35 psi |
| 75°F | 35 to 40 psi |
| 85°F | 40 to 45 psi |
| 95°F | 45 to 55 psi |
A low-side gauge is only a rough charging aid, not a full diagnosis. It cannot confirm the exact refrigerant weight, detect every restriction, or show high-side pressure. If the reading looks abnormal, the compressor cycles rapidly, or the system will not cool after a small top-up, stop and have the system checked with proper gauges and leak testing.
How to do it
This covers a DIY top-up with a low-side can and gauge on an R-134a system. Recharging by weight after a repair belongs at a shop with a recovery machine.
Legal note: do not vent refrigerant. In the U.S., anyone servicing vehicle AC systems for payment or barter must be Section 609 certified and use approved refrigerant handling equipment. DIY cans may be available for personal use, but repeated top-offs are not a leak repair.
- Rule out other faults first. A blown fuse, a failed clutch, or a stuck blend door causes warm air too, and none of those is fixed by refrigerant. If the air is warm but the system holds pressure, do not add more.
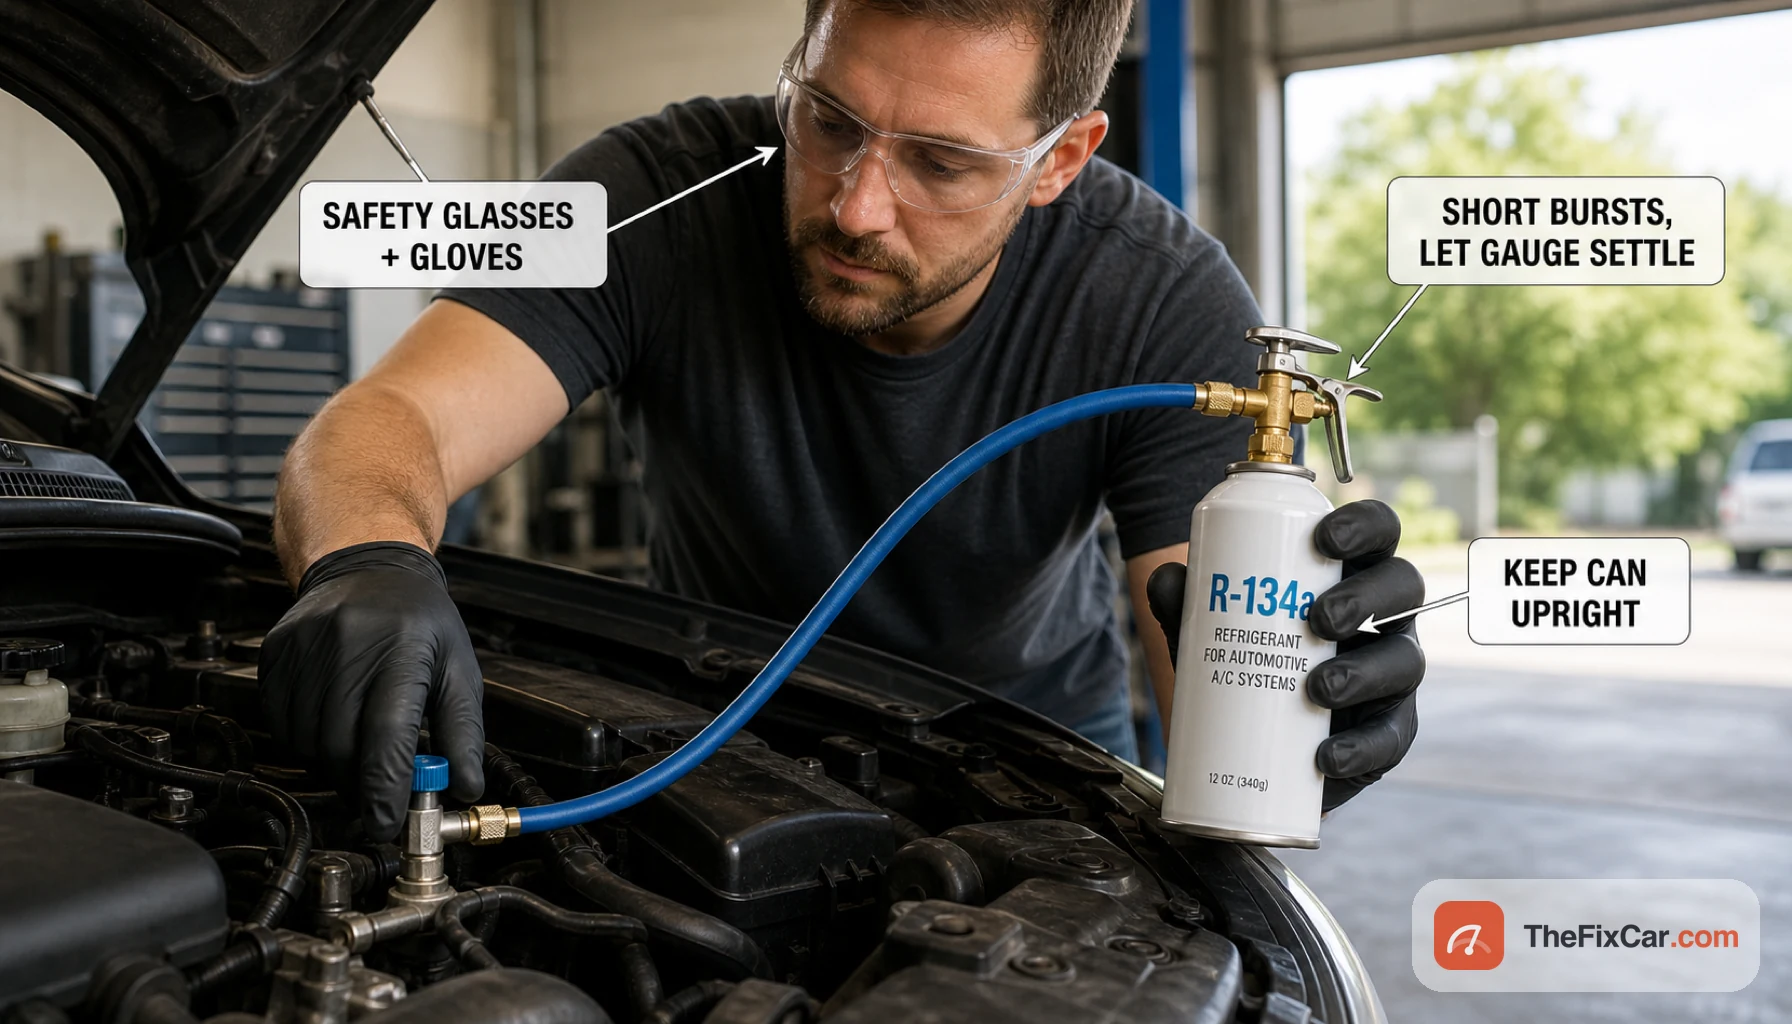
- Put on safety glasses and gloves. Liquid refrigerant hitting skin or eyes causes instant frostbite.
- Warm the engine, set the AC to MAX or recirculate, fan on high, and open the doors so the system works hard while you charge.
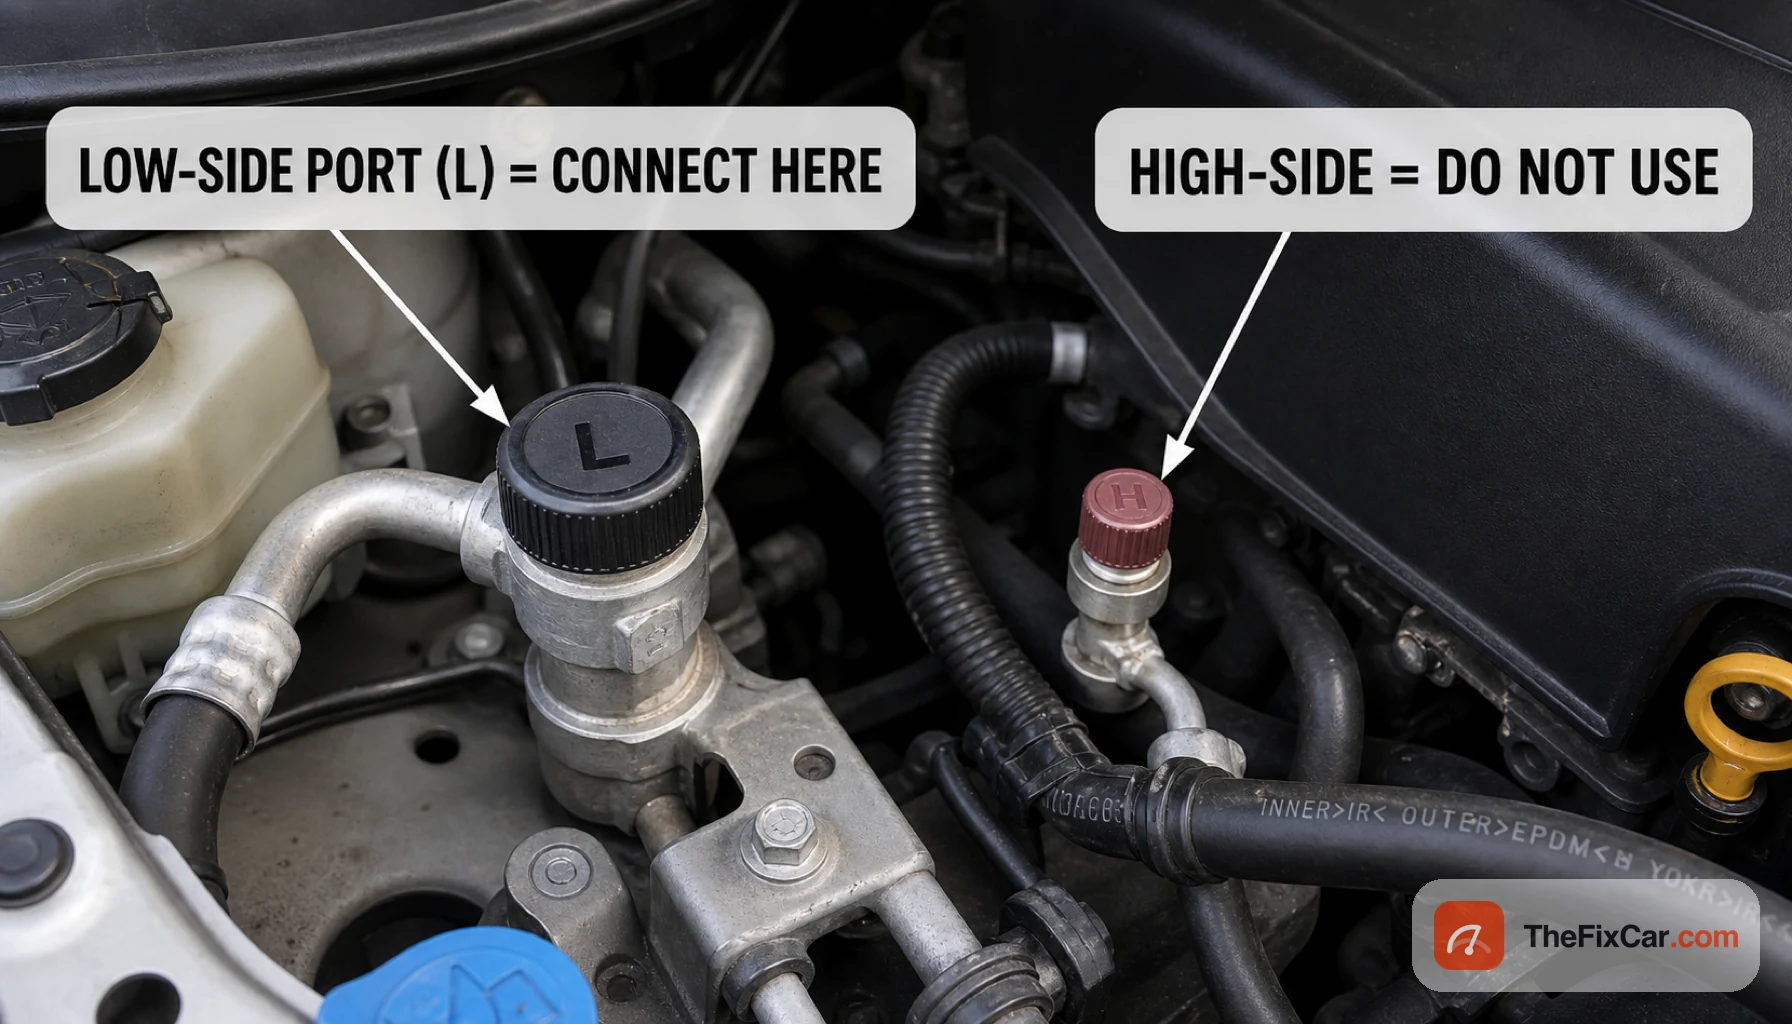
- Find the low-side port. It wears an “L” cap and sits on the thicker suction line that runs from the evaporator to the compressor. The DIY recharge coupler is sized to fit only the low-side fitting, so if it will not click on, you are at the wrong port. Leave the high-side port alone, and wipe the low-side port clean.
- Read the outdoor temperature and note your target low-side pressure from the chart above or the can’s label.
- Shake the can, thread on the hose and gauge, then crack the connector for a second to purge air from the hose before you attach it.
- Push the coupler onto the low-side port until it clicks. Never force the hose onto the high-side port; trapped high pressure can burst the can.
- With the compressor engaged, squeeze the trigger in short bursts, holding the can upright and swirling it. Let the gauge settle between bursts.
- Stop when the low-side reading sits in the target range for the current temperature. Resist adding “a little more” to chase colder vents, which is how systems get overcharged.
- Check the vent temperature with a thermometer; cold output confirms the charge took. Disconnect the hose, recap the port, and store the can upright.
- If the system goes warm again within days or weeks, stop recharging and find the leak. Repeated topping up vents refrigerant into the air and hides a fault that is getting worse.
Do not do this
- Do not connect to the high-side port.
- Do not keep adding refrigerant to chase colder vent air.
- Do not use stop-leak cans unless a qualified shop recommends it.
- Do not mix R-134a and R-1234yf.
- Do not recharge a system that was opened for repair without evacuation and refill by weight.
- Do not keep topping off a system that loses cooling again.
DIY or shop
- DIY difficulty: Moderate. The mechanics are simple, but misdiagnosis and overcharging are easy, and R-1234yf systems are better left to a shop.
- DIY cost: Around $15 to $50 for an R-134a can with a trigger gauge; a reusable manifold gauge adds roughly $20 to $40. R-1234yf cans cost several times more.
- Shop cost: Commonly $150 to $300 to evacuate and recharge by weight, more if they add dye and hunt for the leak.