Search for a jack point diagram and most of what comes back belongs to a different car. There is no universal location, because the reinforced spots are engineered into each body shell and moved around by wheelbase, floor pan design and where the manufacturer put the sills and subframe mounts. What is published, and what this page collects, is everything around the lift: how the points are marked, what the federal rules say about the jack itself, what to do when the sill has rusted, and where a shop gets its data.
The Automotive Lift Institute, which writes the North American lift standard, defines them plainly: lifting points, also called lift points, jack points or jacking points, are the locations on a vehicle where the OEM has instructed lift adapters should be placed to raise and support a vehicle off the ground[2]. The operative word is instructed: the points are a design decision recorded in the documentation, not something to infer from the shape of the underbody.
Quick answer
Your jack points come from your owner’s manual, and nothing on this page replaces it. What the manual shows is commonly one of these: a reinforced pinch weld section under the sill with a notch or an arrow marking it, a moulded pad or bracket under the floor, or a subframe and frame rail point for a shop lift. Once the car is up, get it onto stands immediately. OSHA’s workplace rule for jacks puts it plainly: after the load has been raised it shall be cribbed, blocked, or otherwise secured at once[1]. That standard governs work sites rather than your driveway, but it is the settled practice for a reason. Never work under a car held only by the jack.
Verified requirements at a glance
| Requirement | What it says | Scope and conditions | Primary source |
|---|---|---|---|
| Jack capacity | The manufacturer’s rated capacity shall be legibly marked on all jacks and shall not be exceeded | OSHA workplace rule, 29 CFR 1926.305(a)(1) | OSHA[1] |
| After raising | The load shall be cribbed, blocked, or otherwise secured at once | OSHA workplace rule, 29 CFR 1926.305(d)(1)(i) | OSHA[1] |
| Ground under the jack | Where a firm foundation is needed, the base of the jack shall be blocked or cribbed | OSHA workplace rule, 29 CFR 1926.305(c) | OSHA[1] |
| Contact with the car | Where the metal cap may slip, a wood block shall be placed between the cap and the load | OSHA workplace rule, 29 CFR 1926.305(c), where slippage is possible | OSHA[1] |
| Wood block in practice | Position the jack below the cab pinch weld and use a wood block to protect the paint and sheet metal | GM trucks without running boards, bulletin 20-NA-175 | General Motors[3] |
| Confirming the lift | Position lift pads under the front and rear support points, raise a few inches, and rock the vehicle gently to be sure it is firmly supported | Honda shop procedure, bulletin 22-053 | American Honda[4] |
| Corroded lift points | Where body lift points are damaged by corrosion, lift by the inner frame rail and extend the lift arms as far forward and back as possible for stability | 2003 to 2008 Honda Pilot, bulletin 21-019 | American Honda[5] |
| Where shops get the data | Shops must make vehicle lifting point information available to technicians | ANSI/ALI ALOIM, the North American lift standard | Automotive Lift Institute[2] |
These rows are about the lift itself. Where a location does appear, it belongs to the specific vehicles that document covers. The OSHA rows are workplace requirements under 29 CFR 1926 rather than rules binding a private owner, and they are quoted here because they describe the accepted practice. Locations are vehicle-specific and are not published as a general specification.
What these requirements do NOT mean
- They do not tell you where to put the jack on your car. The locations that do appear above belong to the specific vehicles those bulletins cover, a GM cab pinch weld, Honda support points, an inner frame rail on the Pilot. Yours comes from the manual for your exact year and model.
- A rated jack is not a support device. The rule about capacity is only that it be marked and not exceeded. Separately, the same standard calls for the load to be cribbed, blocked or otherwise secured once it is up[1], and a home garage does not change the physics.
- A marked point is not automatically a sound point. Honda’s own procedure covers what to do when body lift points are damaged by corrosion[5], which is a condition older cars in salted regions can reach.
- A shop lift point is not always a trolley jack point. The ALI guide covers frame engaging lifts, where the adapter geometry and the number of contact points differ from a single jack under one corner.
- The wood block is not decoration. Two documents call for one, for different reasons: OSHA’s rule where the jack cap may slip[1], and GM to protect the paint and sheet metal at the cab pinch weld on the trucks its bulletin covers[3].
How jack points are marked
An arrow or triangle on the sill trim. Common on modern cars with plastic rocker covers. The mark sits above or beside the point rather than on it, and it is pointing at the reinforced section of seam below.
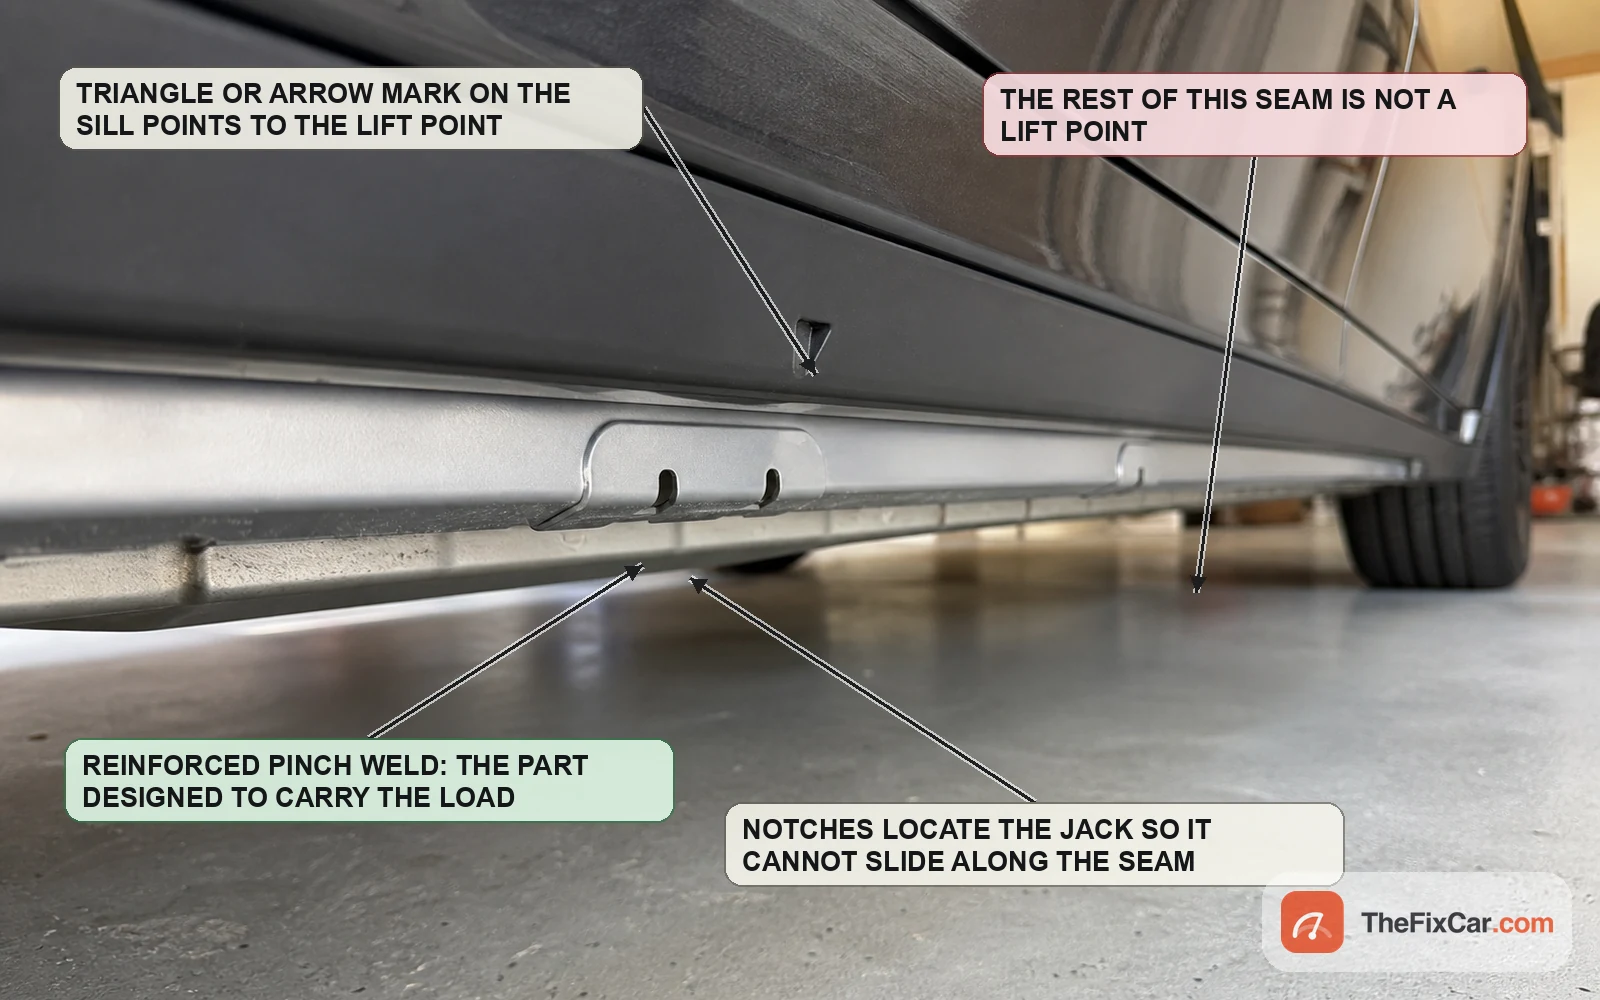
Notches or cut-outs in the pinch weld itself. Where a car uses the seam as its lift point, that section is built up thicker than the rest of it, and the notches locate the jack so it does not slide along the seam. Away from that reinforced section, the same seam is thin sheet metal.
A moulded or bolted pad. Some vehicles carry a dedicated square or round pad under the floor instead of using the seam, which is one way around a sill cover that does not open up.
Nothing visible at all. On plenty of vehicles the point is identified only in the manual, by measurement from the wheel arch or from a body feature. If you cannot see a mark, that does not mean anywhere will do.
Common arrangements, and why knowing them is not enough
Four sill points. Where a unibody car uses them, they sit one behind each front wheel and one ahead of each rear wheel, on the pinch weld. Where a scissor jack is supplied, it is shaped for the points that vehicle’s manual gives.
Central points for two-wheel lifting. Some vehicles publish a front crossmember or subframe point and a rear differential or beam point that let you raise a whole axle with one jack. Many do not, and putting a jack where no such point exists can bend the part, crush it, or let the jack slip.
Frame rails on body-on-frame vehicles. Here the load can be taken on the frame at the points the manual designates, rather than anywhere along it, which is why the GM procedure above talks about the cab pinch weld as a separate matter from the frame[3].
Treat all of that as orientation for reading your manual faster, not as permission to skip it. Two vehicles from the same brand on different platforms should not be assumed to share points.
The jack itself
Check the rating before the weight. The rated capacity has to be legibly marked on the jack and must not be exceeded[1]. Rating a jack against the vehicle’s kerb weight is a common error: a jack under one corner does not carry the whole car, but nor does it carry a neat quarter, and the margin is what you are buying.
The ground matters as much as the point. OSHA’s rule has the base of the jack blocked or cribbed where a firm foundation is needed[1]. Asphalt on a hot day, gravel and a sloped drive can each let a correctly placed jack lean or sink.
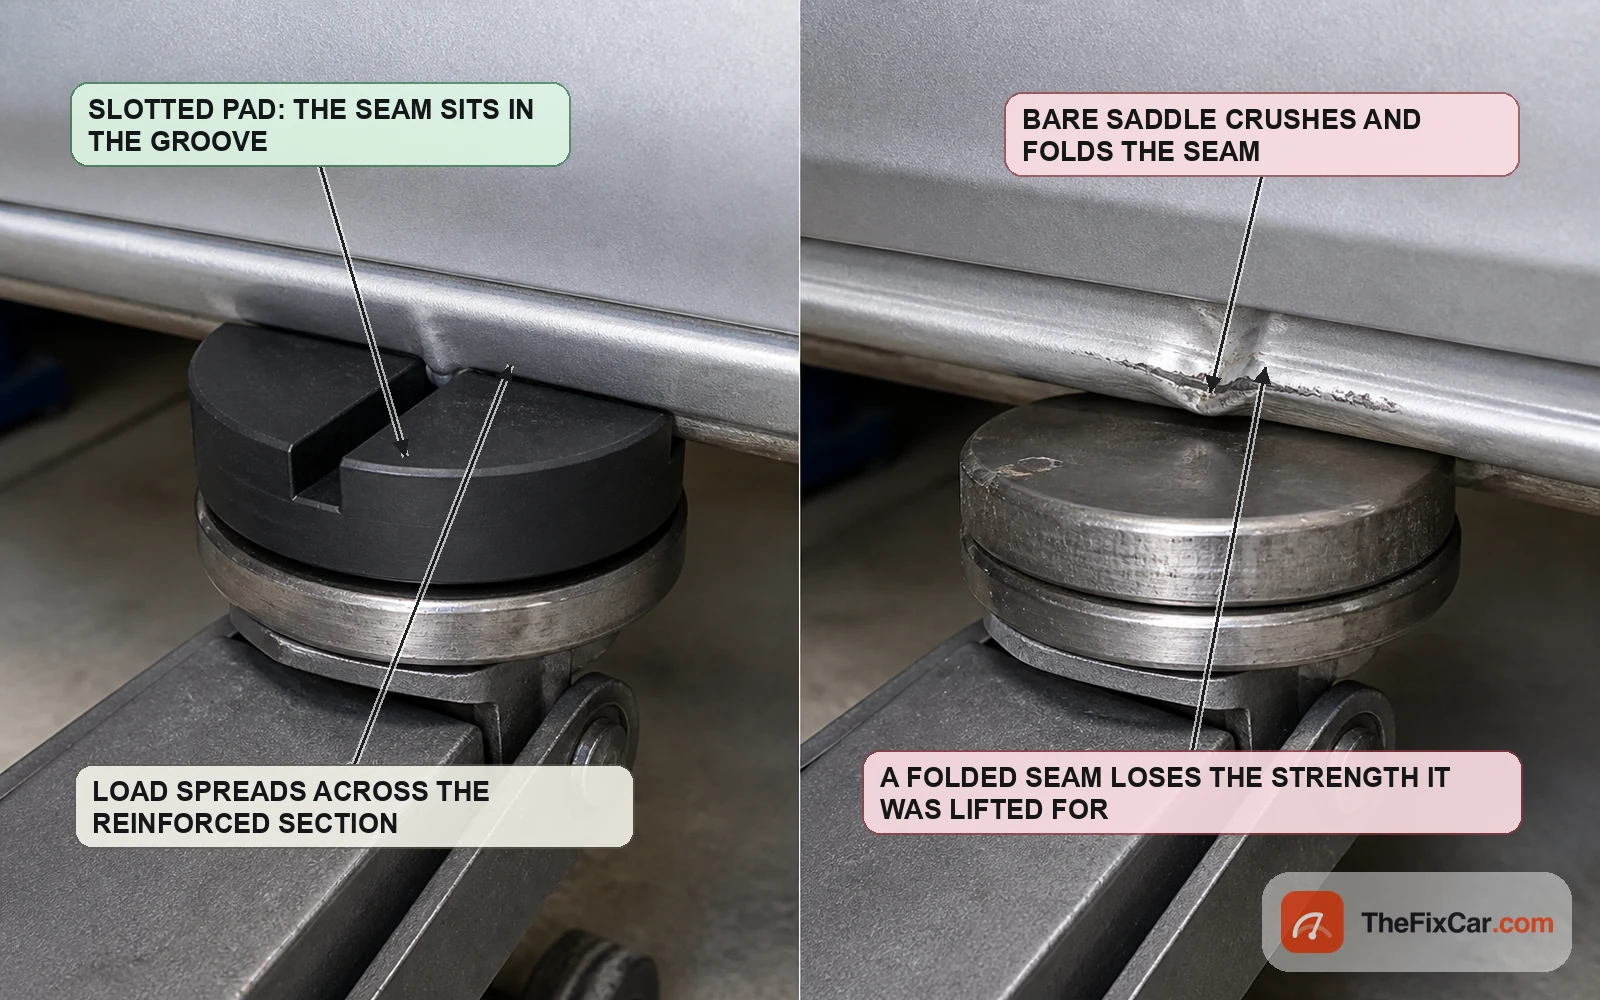
Put something between the saddle and a pinch weld. A slotted pad is the common choice and a wood block is what the documents above name, but the adapter has to suit both your jack’s saddle and the procedure for your vehicle, since some manufacturers specify a particular adapter and some sills take nothing else. A bare flat saddle concentrates the load on the seam edge, which is how seams get folded. Some supplied OEM jacks have a saddle shaped for the seam and need nothing extra: your manual settles that. The seam is thin steel doubled over. A folded seam is harder to seat a jack on next time, no longer the shape it was designed as, and the fold traps moisture afterwards.
Getting it onto stands
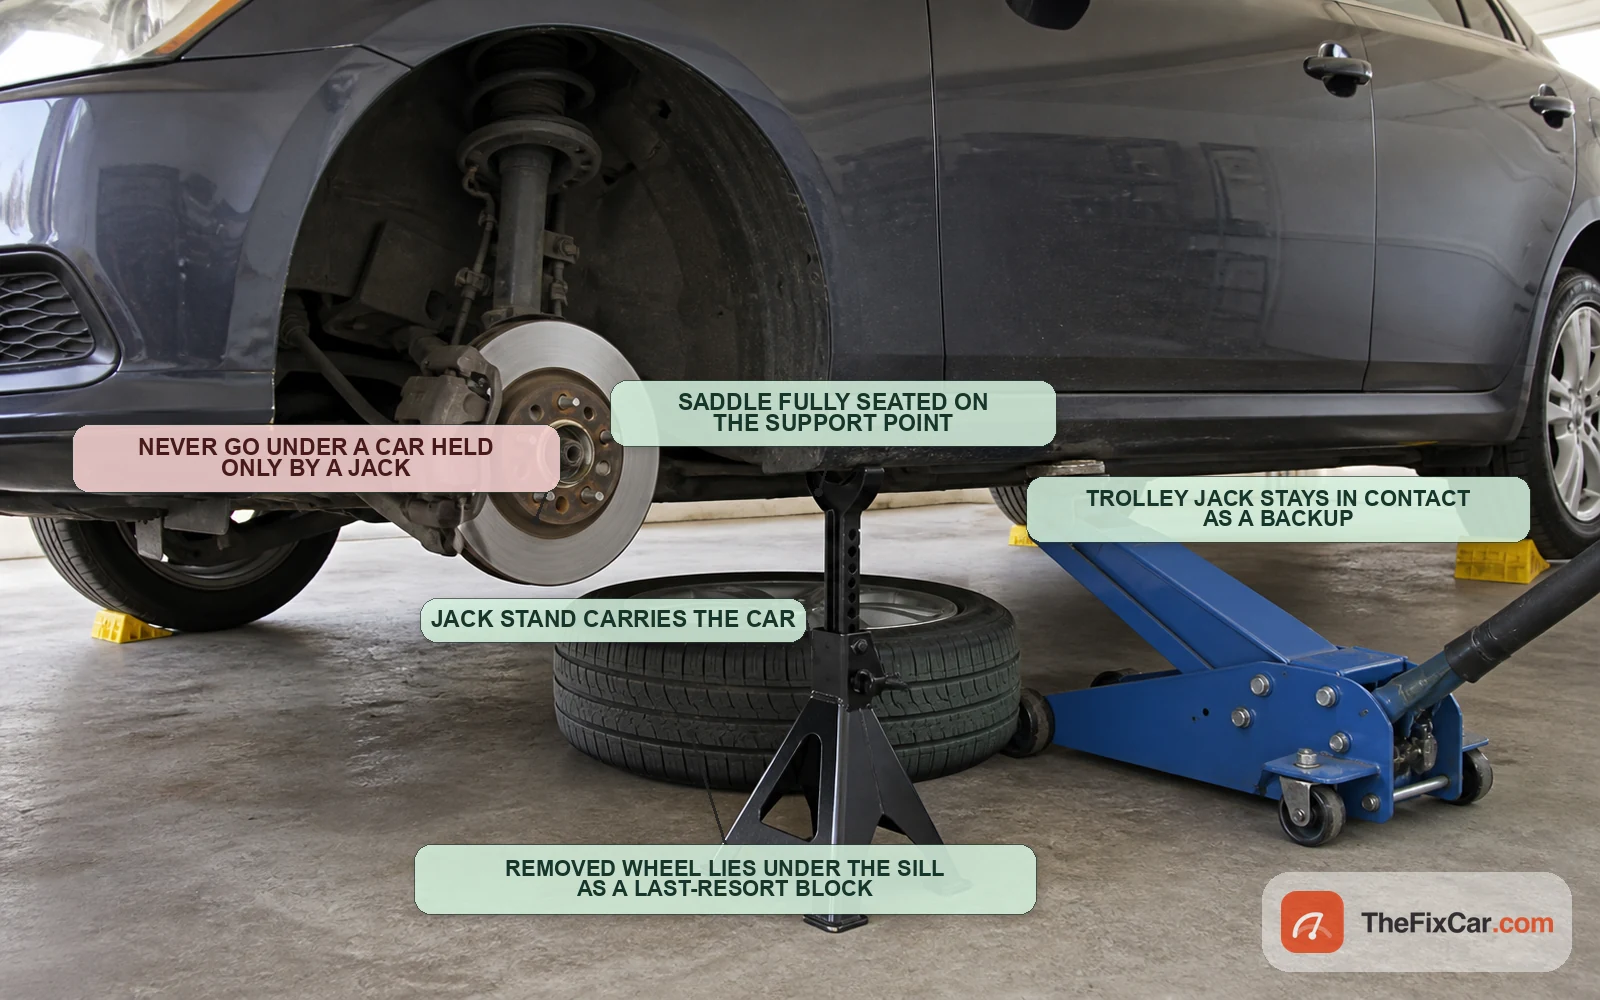
- Chock the wheels that stay on the ground before the jack goes near the car, on flat ground, with the transmission in park or in gear. On most conventional layouts the parking brake works on one axle only, so treat it as a supplement to chocks rather than a substitute for them.
- Place the jack on the point the manual gives, square to it. Fit the adapter or block discussed above, chosen for your jack and your vehicle’s procedure. OSHA’s rule names a wood block specifically where the jack cap may slip[1].
- Raise a few inches and stop. Honda’s shop procedure for the vehicles it covers raises the car a few inches on a lift, then rocks it gently to be sure it is firmly supported before going higher[4]. That procedure is written for a shop lift, not for a trolley jack. Do not rock a car that is standing on a jack. The habit worth borrowing is the sequence: check the setup deliberately before you commit to it, and save the shove for when the car is down on stands.
- Get the stands under a support point your manual designates for them, which is not always the same place as the jacking point, and lower the car onto them. In OSHA’s wording the load is to be cribbed, blocked or otherwise secured at once[1], and a jack does not do that job.
- Lower until the stands carry the car, then leave the jack just in contact rather than removing it. It buys a little margin if a stand shifts, and it is not a second support sharing the load. A hydraulic jack can bleed down or roll, so it is not something to rely on either.
- Slide the removed wheel under the sill as an extra block if you are going underneath. It is something to hit on the way down, never a substitute for stands.
- Test it before you trust it. With the car on the stands and the jack still in contact, give it a gentle shove at a fender, enough to see whether anything settles, not enough to rock it off the stands. If anything shifts, lower it and start again.
Where not to lift
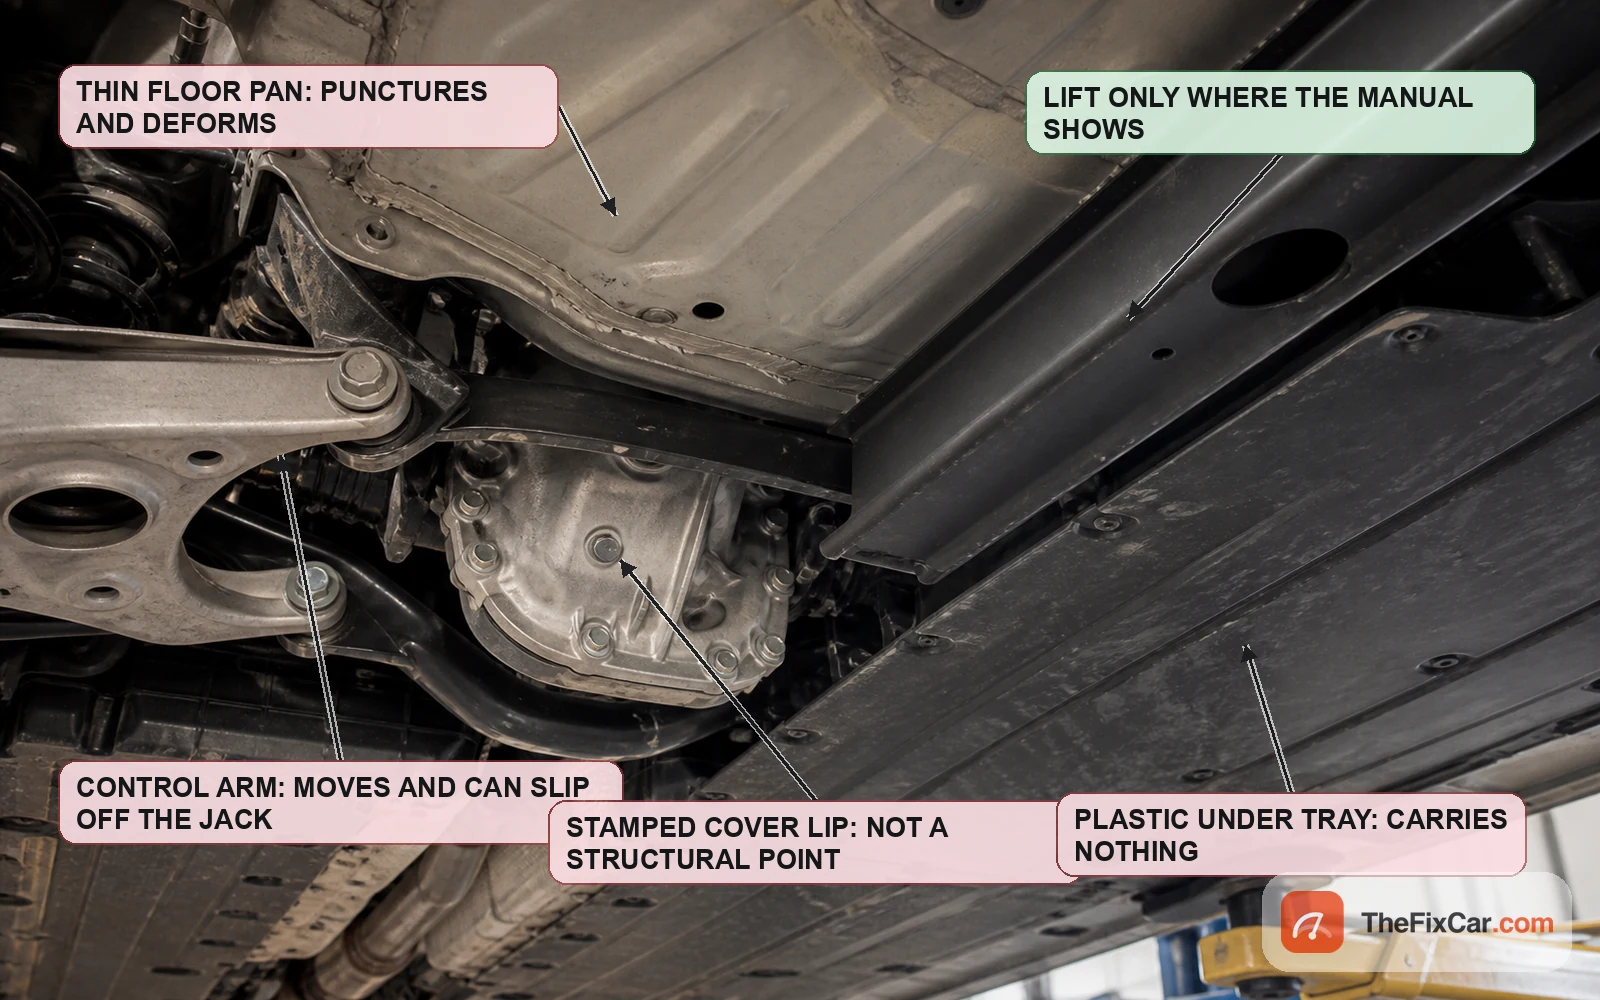
- The floor pan. Thin stamped steel that dents and punctures, and on many cars there is a fuel line or a brake line above it.
- Suspension arms and links, unless your procedure names them. They move through their travel, and a jack under a control arm can slip as the geometry changes. Some OEM procedures do specify a suspension point, which is exactly why the manual decides this and not habit.
- Stamped covers and their lips. A differential or transmission pan lip is a sealing surface, not a structural point.
- Plastic under trays and aero panels. They carry nothing and hide what is behind them.
- The unreinforced length of the pinch weld. The same seam away from the marked section is ordinary sheet metal.
- Anything on an electrified vehicle without checking. High voltage battery packs occupy the floor on many of them, and the lifting points are placed around the pack. A jack driven into a high voltage pack is not a panel repair, and the vehicle may not be safe to approach afterwards.
When the points are rusted
Corroded lift points are a real category, not an edge case. Honda’s bulletin for 2003 to 2008 Pilot models includes a direct instruction: where the body lift points are damaged by corrosion, lift the vehicle using the inner frame rail, extending the lift arms as far forward and back as possible to maintain stability[5]. That is written for a shop lift and for those vehicles, but the principle behind it travels: a rotten point is not a point.
What to look for. Flaking layers rather than surface rust, a seam you can deform with thumb pressure, holes behind the sill trim, and previous jack damage that has folded the seam and trapped salt inside the fold.
What to do about it. Do not improvise a new point on a rusty car by eye. Get it on a lift with a technician who has the vehicle’s lifting point data, and treat structural corrosion at the sills as its own repair rather than an obstacle to the job you meant to do.
FAQ
Where are the jack points on my car? In your owner’s manual, under jacking or wheel changing. There is no general answer, because the reinforced areas are designed into each body shell. If the manual is missing, check the manufacturer’s owner information site for your model year.
Can I jack a car up anywhere on the pinch weld? No. Only the reinforced section is a lift point. On some vehicles it is marked by notches, an arrow or a moulded pad; on others it is identified only in the manual. The rest of the seam is thin doubled sheet, and that is what gets folded.
Do I need a jack pad or adapter? On a pinch weld, most jacks need something between the saddle and the seam, chosen to suit your jack and whatever your vehicle’s procedure specifies. Some supplied OEM jacks have a saddle already shaped for the seam and need nothing added. OSHA’s workplace rule calls for a wood block where the jack cap may slip[1], and GM’s procedure calls for one at the cab pinch weld to protect the paint and sheet metal on the trucks it covers[3]. A slotted rubber pad is the usual alternative, and it also locates the seam in the groove.
Is it safe to work under a car on a jack? No. OSHA’s rule for work sites is explicit that once the load is raised it shall be cribbed, blocked, or otherwise secured at once[1], and the same reasoning applies at home. Use stands rated for the load, and read the rating carefully: many are marked per pair rather than per stand. Leave the jack in contact afterwards for a little margin.
What size jack do I need? One whose marked rated capacity is not exceeded by what you are lifting, which is how OSHA frames it for work sites[1]. Work from the vehicle weight given in the manual rather than from a guess. Read the door jamb label carefully if you use it at all: it commonly carries gross vehicle and axle weight ratings and tire loading information rather than the car’s actual weight.
Where do shops get lifting points? From OEM data. The ANSI/ALI ALOIM standard requires shops to make vehicle lifting point information available to technicians, and the Automotive Lift Institute publishes Vehicle Lifting Points for Frame Engaging Lifts, covering most cars, SUVs, vans and light trucks sold in the United States and Canada from 2000 through 2026 in more than 250 undercarriage images[2].
Are jack points different on an electric car? They can be. Where the battery pack occupies the floor, the lifting points are placed around it, and some manufacturers require specific adapters. Check the manual before the jack touches anything.
Sources & verification
Last technically reviewed: Aug 2026
Reviewed by: Ray Donovan
Primary references: 29 CFR 1926.305, the Automotive Lift Institute lifting points guidance and ANSI/ALI ALOIM, and manufacturer service bulletins filed with NHTSA (General Motors, American Honda)
Suggested citation: TheFixCar, “Car Jack Points: Locations, Markings and Lifting Requirements,” updated Aug. 2026. https://thefixcar.com/specs/car-jack-points/