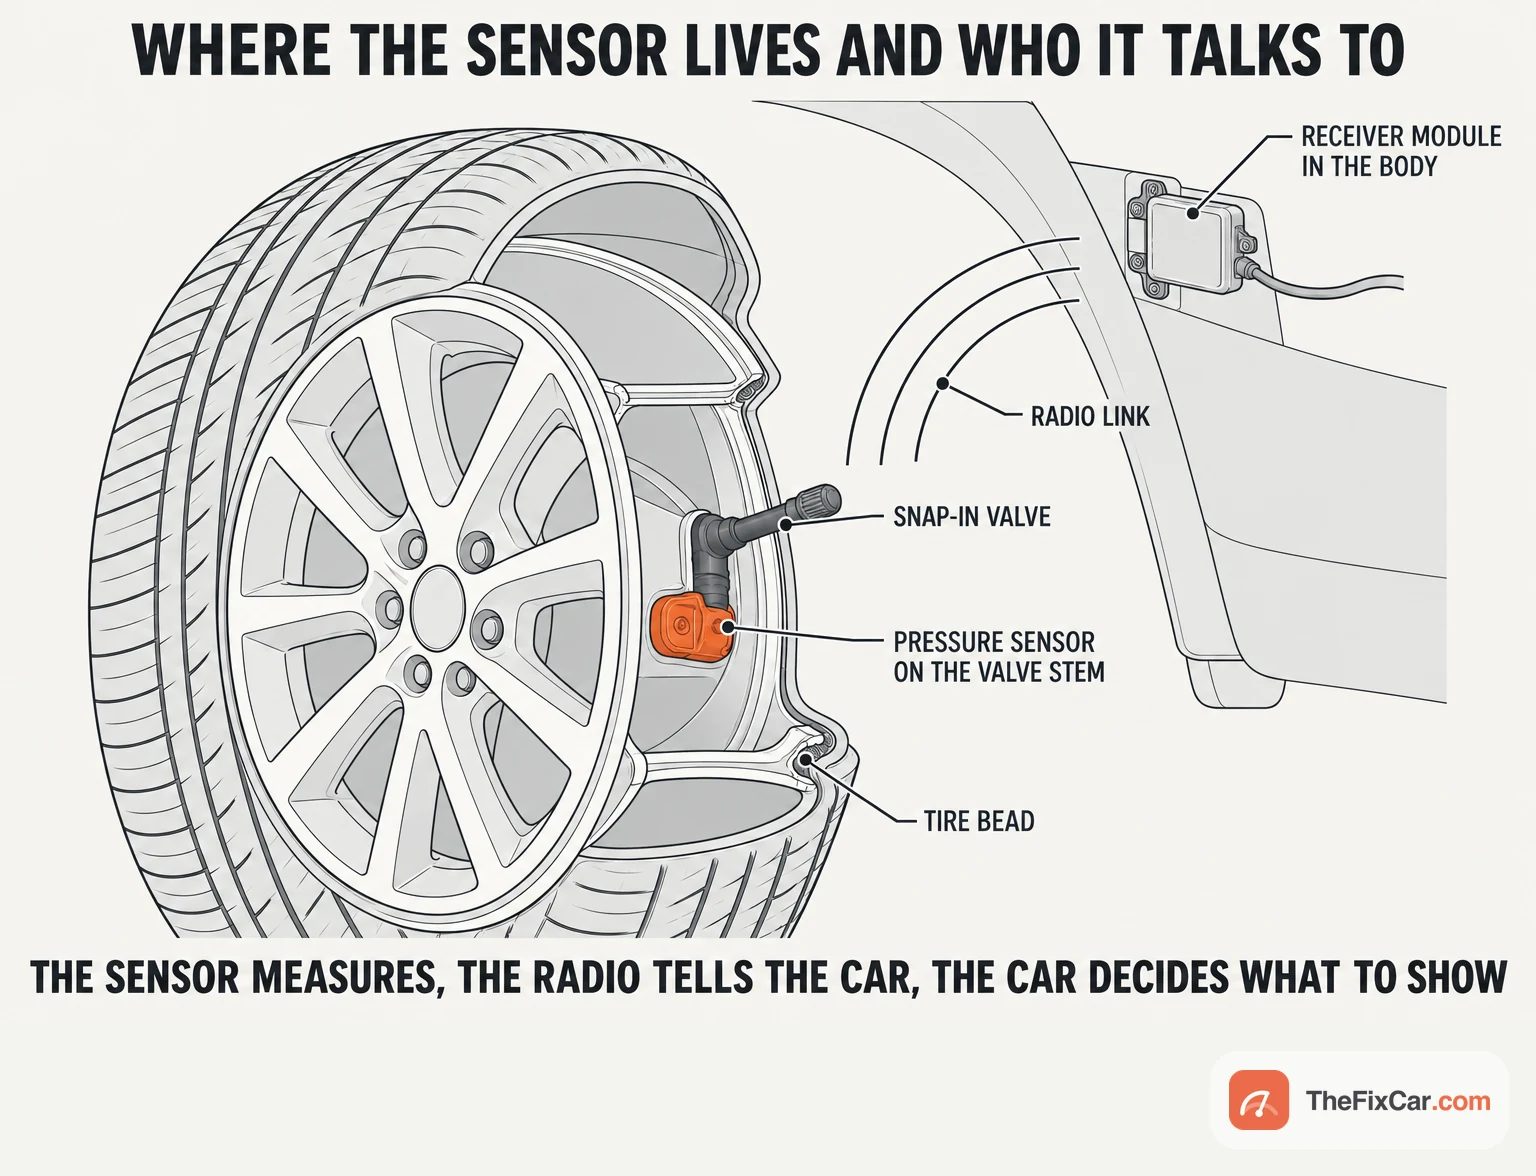
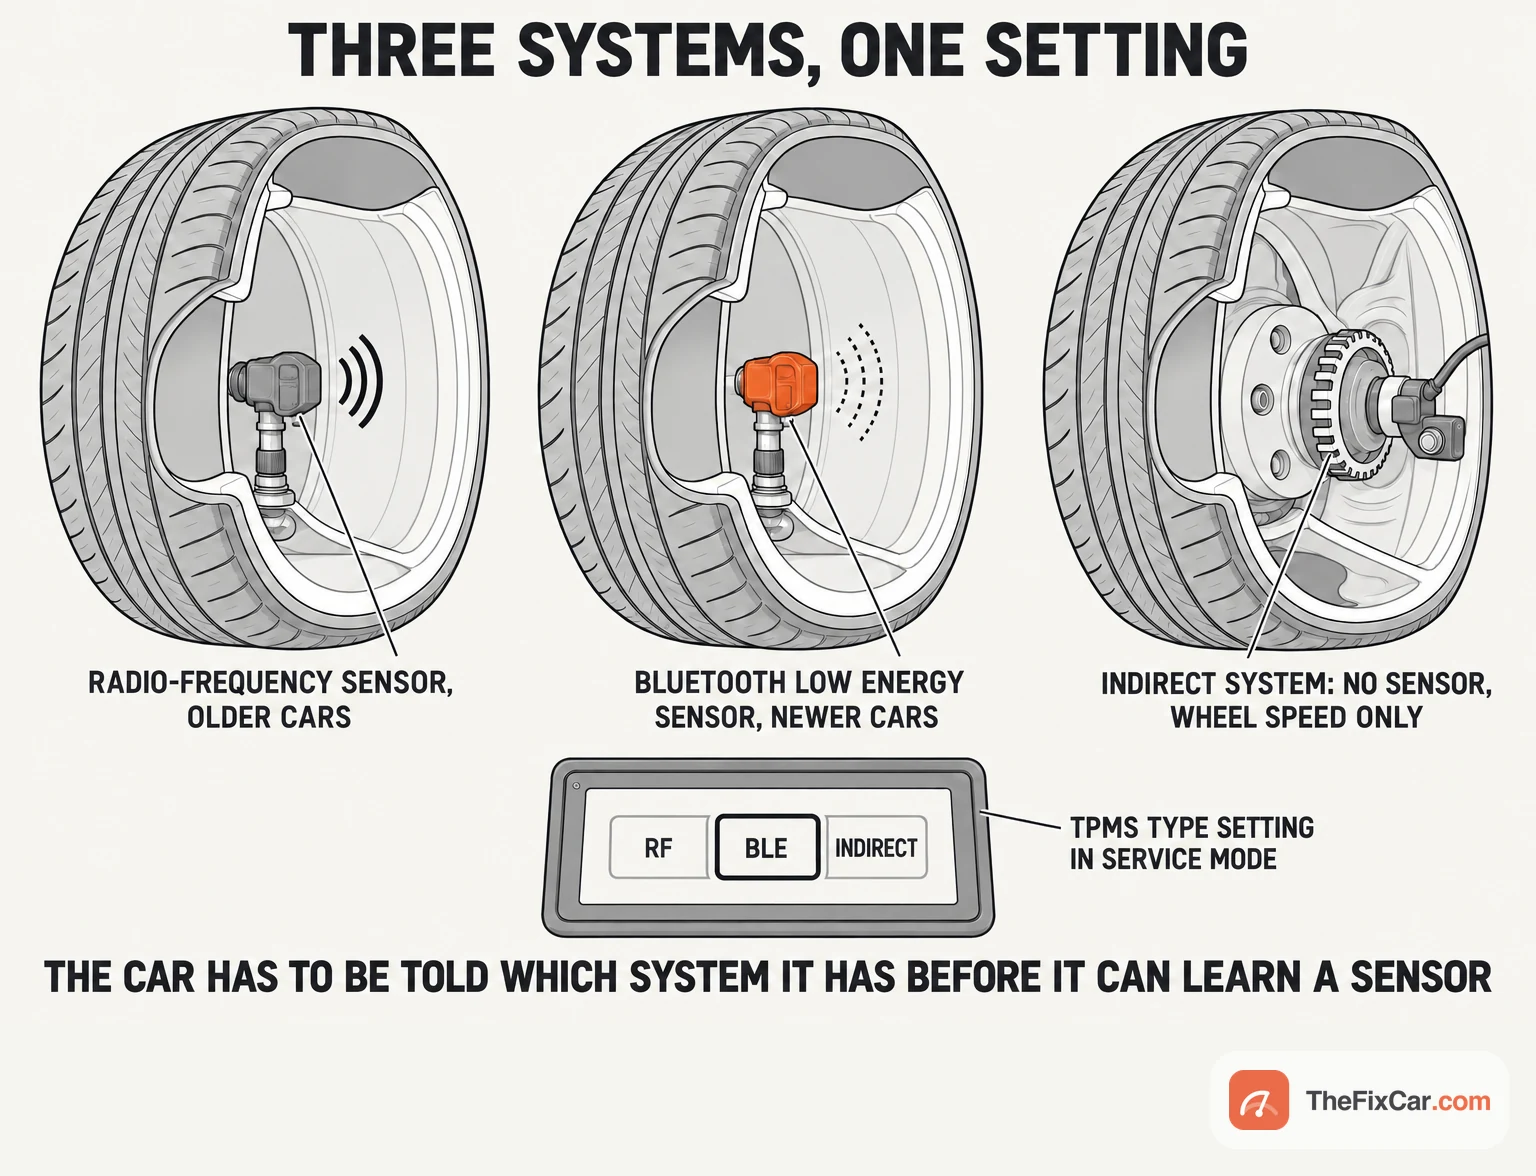
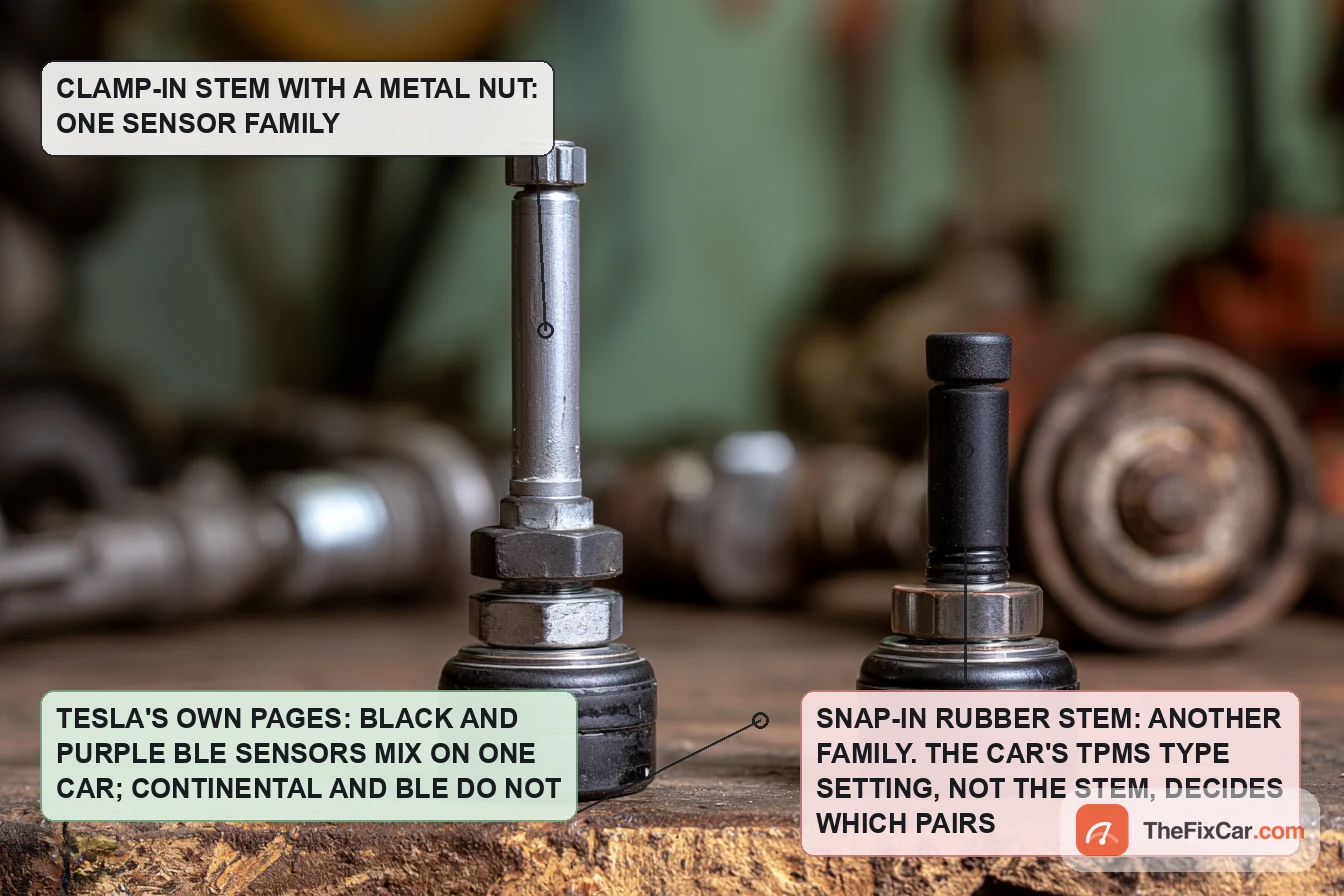
Identify the tire pressure monitoring system fitted to the car before ordering a sensor. Tesla’s own configuration routine for the Model 3 Standard lists three choices for the car’s TPMS type: Tesla BLE, Continental and Indirect TPMS, and the older Model S procedure documents Baolong sensors as well.[8][10] Those are the configurations the cited manuals name, not a complete hardware history of every Tesla. The fitted system determines which sensors and tools are compatible and which replacement, configuration and learning procedure applies.
Confirm the fitted system, then follow the matching sensor installation, configuration and learning procedures. A sensor that will not pair can be a configuration or a wake-up problem rather than a dead sensor, and the pages document both.
Quick answer
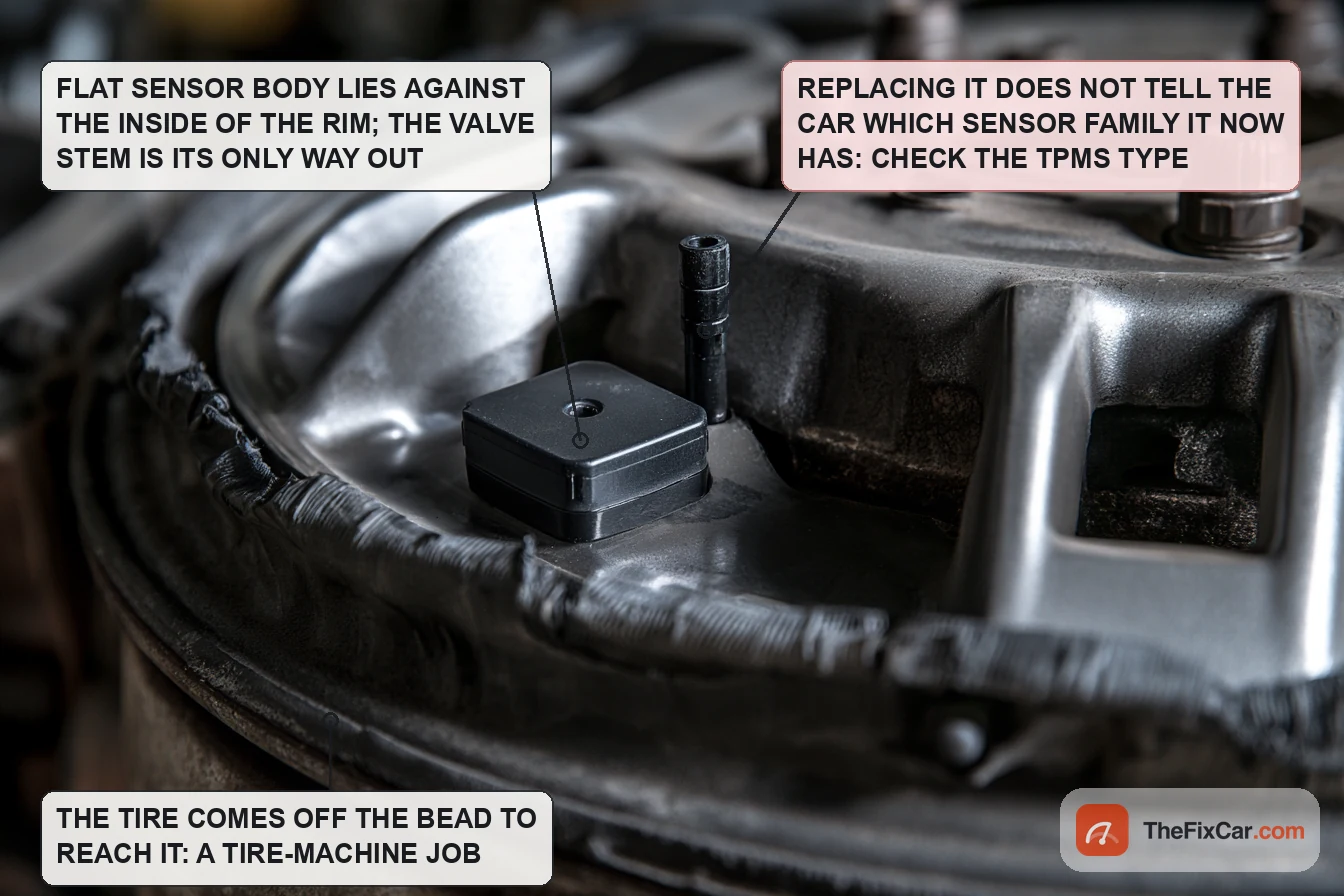
Four steps, in this order. Confirm the car’s configured TPMS type with the service information for its model and software version; the Model 3 Standard retrofit routine shows Tesla BLE, Continental and Indirect TPMS as the choices, and an indirect system has no wheel-mounted sensors to replace.[8] Fit sensors that match that type, from Tesla or a maker whose coverage list names the car. Gauge every tire and set the cold pressures to the placard; do not drive on visible tire damage, rapid pressure loss or a tire that will not hold its pressure, because a relearn does not repair a leak. Then run the relearn for the exact vehicle and repair: the 2017 to 2023 Model 3 BLE retrofit, for example, specifies a test drive at 15 mph (24 kph) for 1 to 3 minutes followed by a check that all four sensors report pressure, and that is one page’s instruction, not a rule for every Tesla.[1] Torque, socket size and cleaning are in the replacement section below.
What each check can and cannot tell you
| Check | What it tells you | What it does NOT prove |
|---|---|---|
| Touchscreen tire pressures, a reading for each wheel | The display holds a pressure for every wheel; confirm the readings have updated during the check | Continuous communication, current pressure, sensor battery life, or that the car is configured for the sensor you are about to buy |
| TPMS type in the vehicle configuration (Tesla BLE, Continental, Indirect) | Which sensor family the car expects, and whether it expects any at all | Which sensors are physically in the wheels; a car can be set one way and carry another set after a wheel swap |
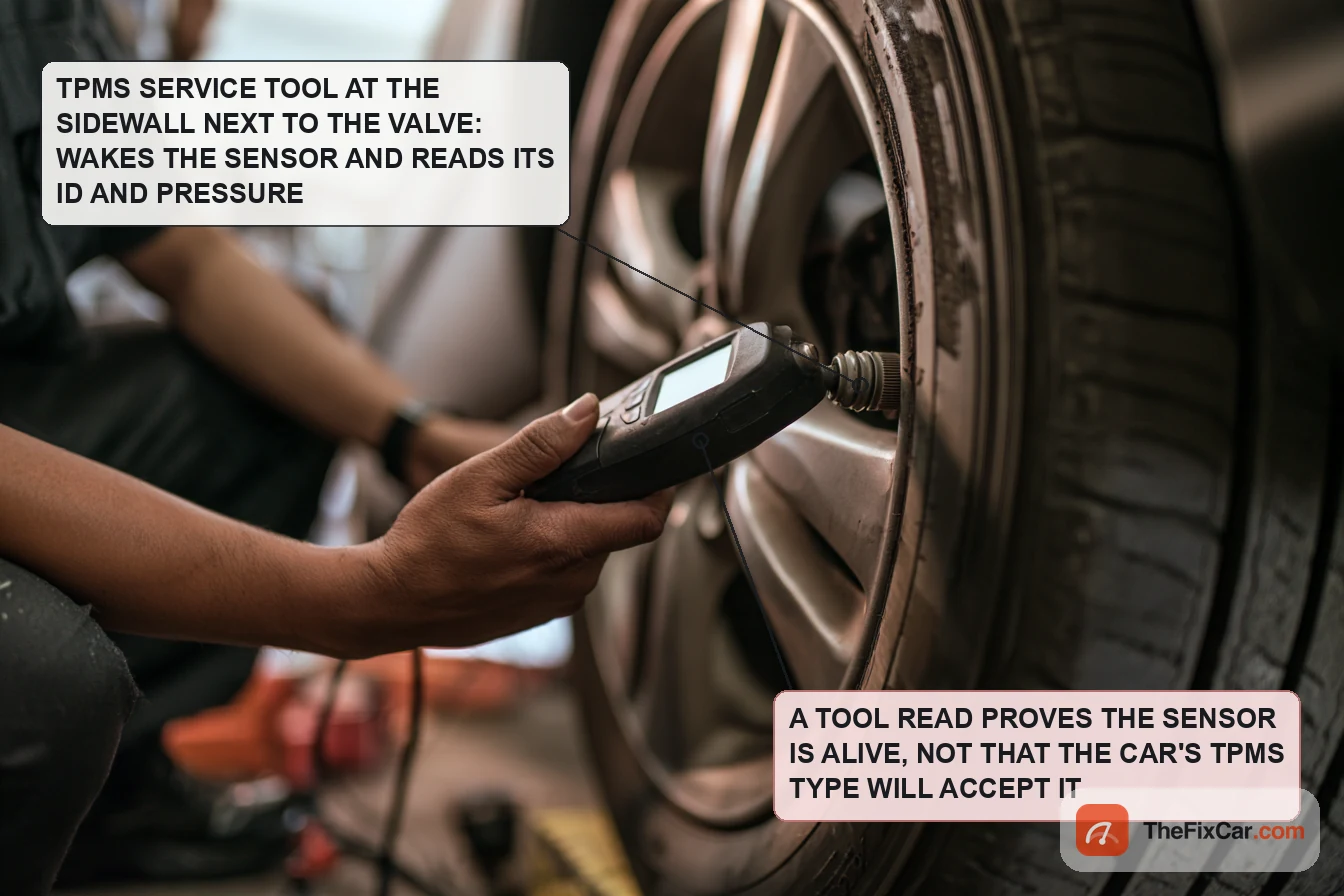
| Compatible TPMS service tool read at each wheel | The tool communicated with that sensor and retrieved the ID and pressure it shows | Vehicle compatibility or remaining battery life; a failed read can also be an incompatible tool, software or activation condition |
| Vehicle-specific drive-learn procedure | Whether the car can pair the sensors that are actually fitted | That the tires are leak-free or an intermittent sensor fault is gone; a failed relearn does not say which component is at fault |
Which system your Tesla has
For the 2017 to 2023 Model 3 applications covered by its module procedure, the Continental Gen 2 system uses a separate TPMS module behind the rear trim, while Tesla’s TPMS module is integrated into VCSEC, the body security controller.[9] The Model 3 BLE retrofit takes a Continental car to BLE: it replaces all four wheel sensors, changes the vehicle configuration, then test drives at 15 mph (24 kph) for 1 to 3 minutes and confirms four pressure readings.[1]
The Continental-to-BLE retrofit also requires a configuration update. In Tesla’s Toolbox the vehicle configuration value tpmsType is set to Tesla Ble, the centre display reboots, the LEARN-TP-TYPE action runs so the gateway uses the BLE system, and the learnt tire offsets are cleared.[2] Tesla documents indirect-to-BLE retrofits for the Model Y Standard and Model 3 Standard applications covered by its 2025 and later Model Y and 2024 and later Model 3 manuals. The Model Y procedure uses Service Mode, Chassis > TPMS > Change to BLE, after the sensors are fitted.[7] The Model 3 procedure documents a Service Mode TPMS-type configuration routine with Tesla BLE, Continental and Indirect TPMS as the options.[8] Confirm the retrofit applies to the vehicle; the manuals’ year ranges alone do not establish factory equipment. The cited procedures do not establish a complete factory-fitment timeline by model, build date and market; use the identification method documented for the vehicle, and do not change its configuration merely to inspect it. If you cannot identify the system, ask Tesla or a TPMS-equipped tire shop to confirm the configured TPMS type and identify the fitted sensors before ordering replacements.
For the application covered by the 2025 and later Model Y retrofit page: Tesla’s updated black sensor performs and is serviced the same as the original purple one, both can be installed on different wheels of the same vehicle, and the mounting nuts are cross-compatible.[7] On the aftermarket side, Autel markets its MX-Sensor BLE as a pre-programmed sensor for Tesla Model 3, Y, S and X with programming support through compatible Autel tools, and claims a battery life of 6 years or more; the product page lists no model years.[12] When choosing an aftermarket sensor, confirm its vehicle and TPMS application coverage as well as its wheel and valve fitment.
What a TPMS warning tells you
U.S. Federal Motor Vehicle Safety Standard 138 sets the low-pressure threshold for covered vehicles at 25 percent below the manufacturer’s recommended cold inflation pressure or the applicable table minimum, whichever is higher, under defined test conditions. A combined telltale reports a system malfunction by flashing for 60 to 90 seconds at the start of each operating cycle and then staying lit until the fault is corrected.[11] A TPMS fault after a wheel swap calls for checking the fitted sensors, the vehicle configuration and the applicable learning procedure; the warning alone does not identify the cause.
How to replace a BLE sensor
These steps summarise the cited 2020 to 2024 Model Y sensor replacement and the 2017 to 2023 Model 3 BLE retrofit. Use the current Tesla procedure for the vehicle and the installation requirements of the chosen compatible sensor; confirm the permitted bead-access method, the cleaning method, seal and nut reuse and the tightening torque before starting. The values below describe the cited Tesla installations.[6][1]
- Lift the car at its specified points and remove the wheel. Use the vehicle’s lifting points and lifting mode where required, and proper support; without that equipment, a tire shop does this job. Then deflate the tire through the valve core. Tesla’s warning: the tire deflates rapidly, so safety glasses and gloves go on first.[6]
- Break the bead and take the tire off, or push the bead down to expose the valve area. The Model Y page removes the tire; the Model 3 retrofit works with the upper bead rolled down on the tire changer.[6][1]
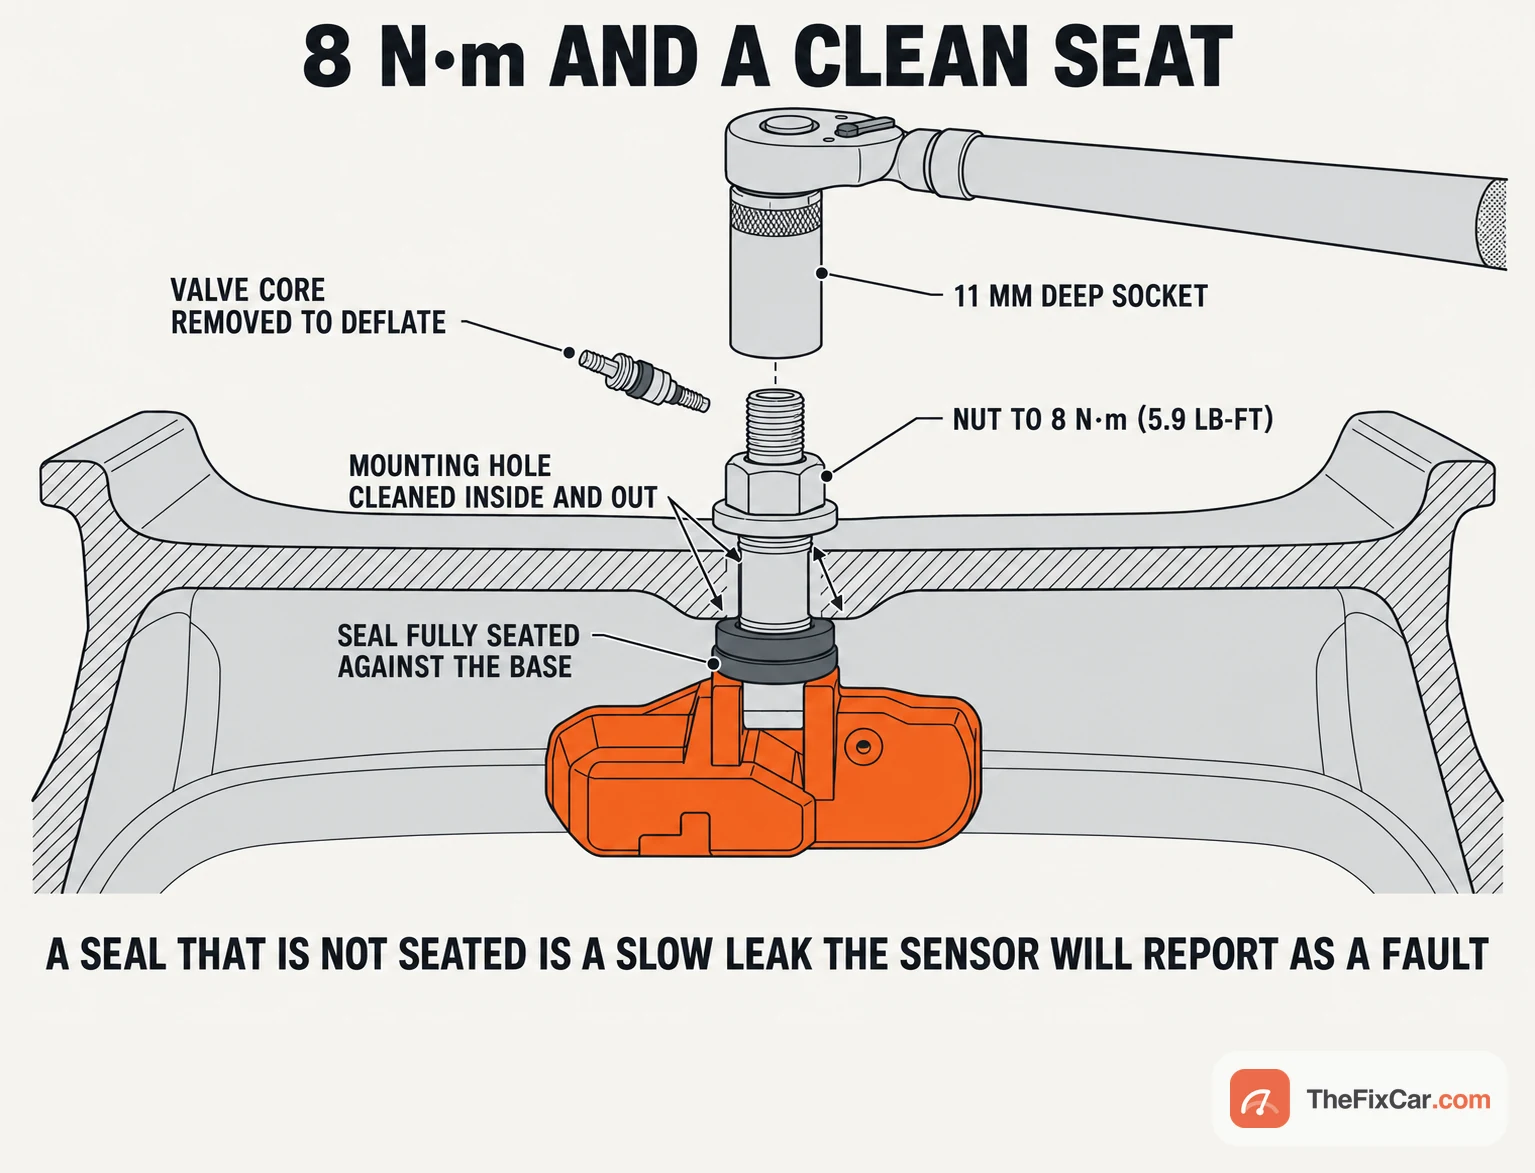
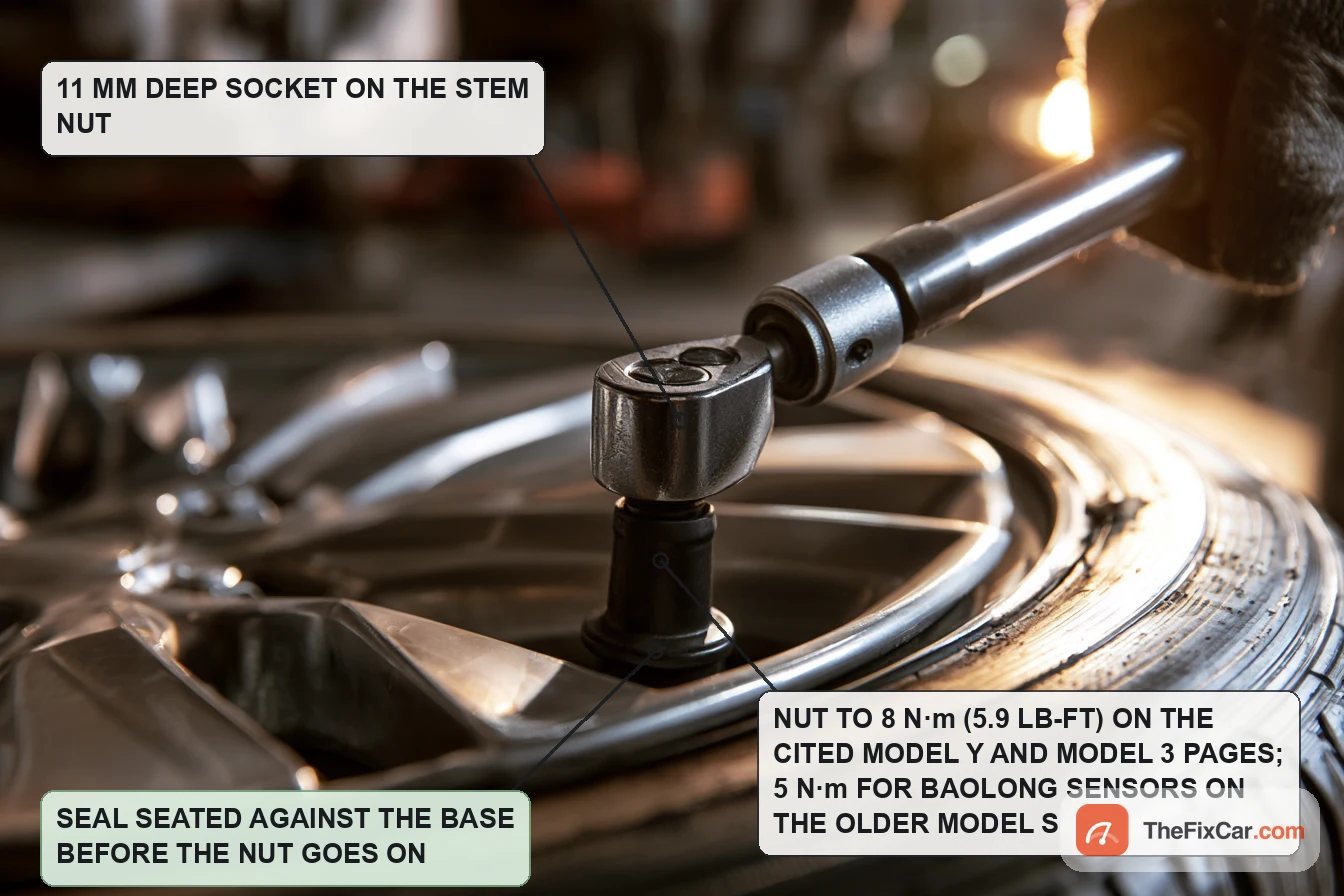
- Remove the nut and the old sensor. An 11 mm deep socket fits the nut, which the Model Y page lists for reuse.[6]
- Clean the mounting hole inside and out with an IPA wipe, then fit the new sensor so it sits closely to the wheel and verify its seal is fully seated against the base; Tesla’s note is that failure to do so can damage the seal.[6]
- Torque the nut to 8 Nm (5.9 lb-ft). The same value appears on the Model Y sensor page and the Model 3 BLE retrofit; the 2012 to 2020 Model S page shows why the number is sensor-specific, with 5 Nm for its Baolong sensors and 8 Nm for Continental.[6][1][10]
- Seat the bead, fit the valve core, set the pressure, check for leaks, balance and refit. Complete bead seating and the valve core under the applicable tire-changing procedure, within the bead-seating limits for the actual tire, wheel and machine; the 2025 Model Y retrofit gives the sidewall pressure as its limit, and the Model Y sensor page links the balance as a separate operation.[7][6] Set the cold pressure to the placard, check the valve and the disturbed bead for leaks, then refit the wheel at the vehicle’s wheel-fastener torque.
- Correct the configuration only if it is wrong or the system changes. A like-for-like replacement does not require changing a correct TPMS type setting; since a December 2024 revision the Model Y sensor page carries no sensor ID programming step at all.[6] If the fitted sensors and the vehicle configuration disagree, identify the supported configuration for that vehicle before changing anything: an incompatible wheel or sensor set is resolved with compatible hardware, and a supported retrofit is a separate, intended repair. For the Continental-to-BLE retrofit described here, follow the cited Toolbox procedure; for the Model Y Standard indirect-to-BLE retrofit, its Service Mode procedure.[2][7]
How to relearn the sensors
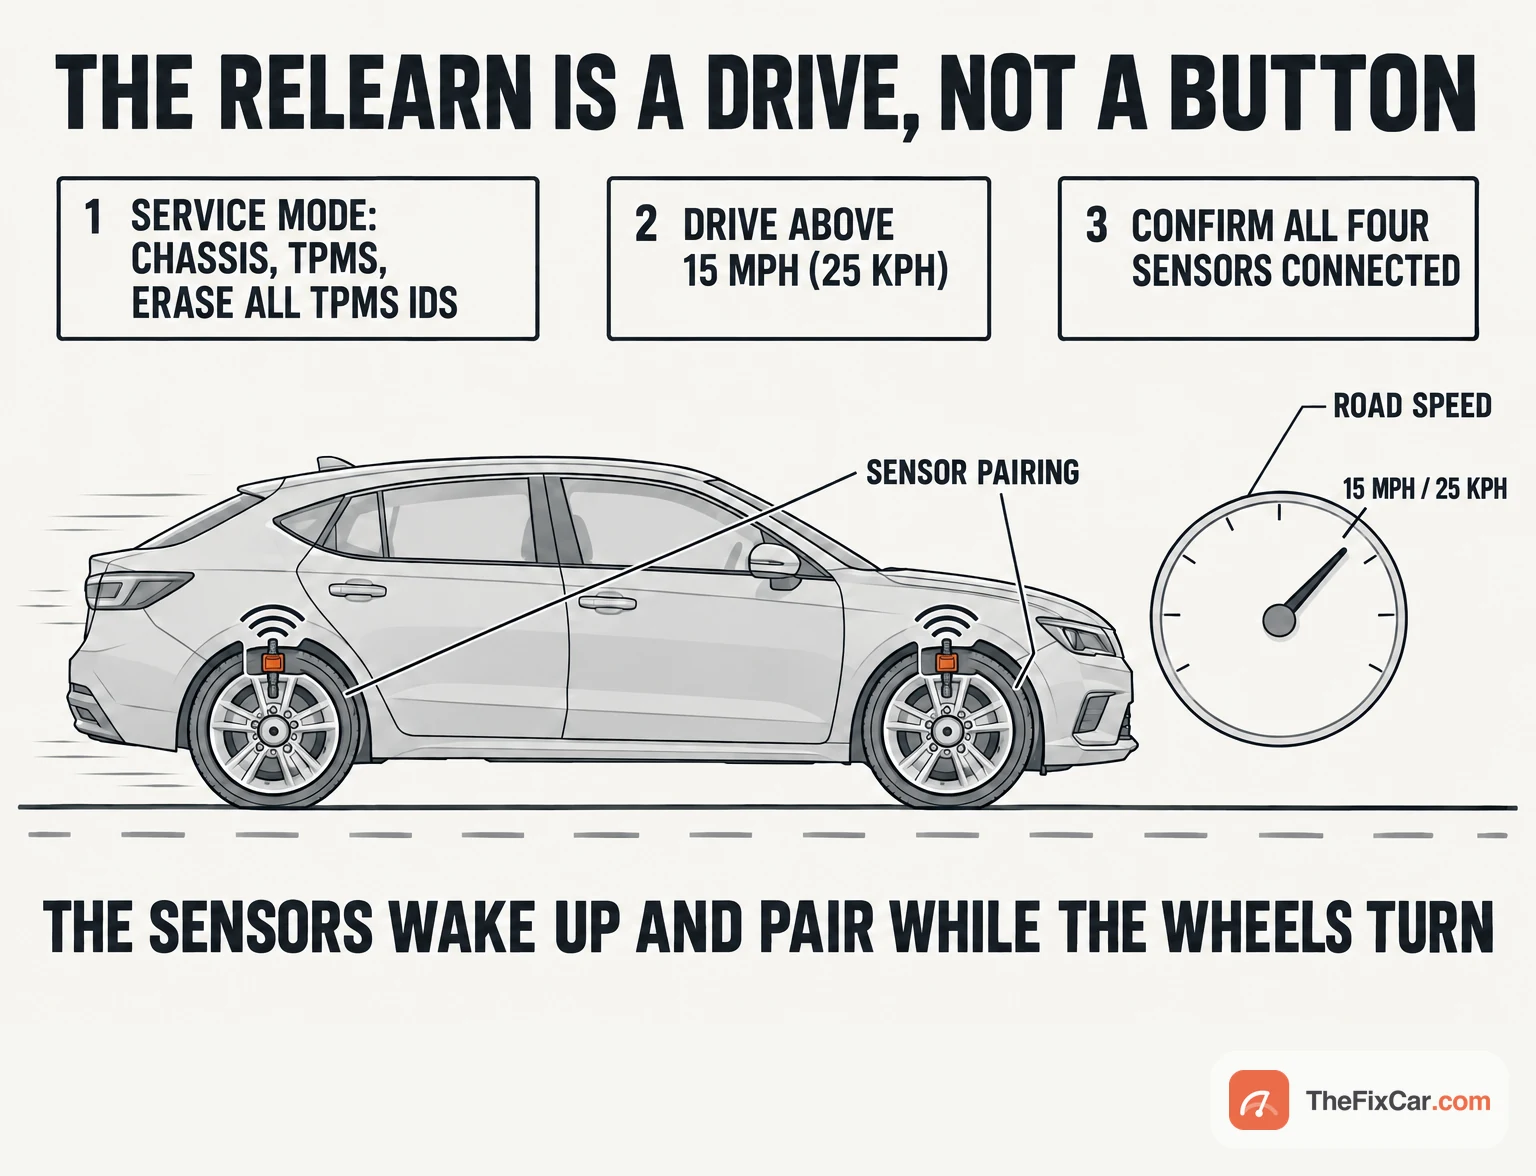
The cited 2024 and later Model 3 drive-learn procedure runs on the touchscreen: enable Service Mode, unlock the gateway, open Chassis > TPMS, touch the green button and select Erase All TPMS IDs, confirm they are erased, remove the Service Mode speed limit, drive above 25 kph (15 mph) to pair the sensors, then confirm on the same screen that all sensors are connected and exit Service Mode.[4] The 2017 to 2023 Model 3 version of the same procedure gives the drive as at least 15 mph (24 kph) for 1 to 3 minutes and ends with four pressure readings on the touchscreen.[3] Gauge the tires and set the placard pressures before either drive.
For its Continental-equipped applications, the 2017 to 2023 Model 3 procedure says auto-learn starts only after the drive rail has been off for more than 20 minutes. Cycling the drive rail, for example to open a gate, prevents auto-learn from starting. The documented remedy on those applications is to reset VCFRONT from the touchscreen under Low Voltage > Power Distribution, which resets the TPMS ECU and triggers auto-learn again. Do not apply that controller reset to another model without matching service information.[3] The older Model S procedure asks for approximately one minute above 20 mph (32 km/h) after its sensor-specific ID learn.[10]
The 2017 to 2023 Model 3 manual also describes a sensor ID tool learn for its covered applications: a TPMS service tool reads and records each wheel sensor in the order shown on its screen, the IDs are entered through Toolbox’s TPMS Sensor Learn action, and a test drive to at least 15 mph follows. Before using it, confirm that the procedure and the tool support the installed system; it does not replace the road test.[5] Confirm the completion criterion of the procedure you used: the 2024 and later drive learn checks that all sensors are connected, while the retrofit and the older drive learn call for four displayed pressure readings.[4][1][3]
DIY difficulty and tools
Sensor replacement needs tire-changing equipment, correct installation and wheel balancing; without that equipment it is a tire-shop job with the sensor supplied or specified. A drive relearn avoids tire removal but still needs the exact vehicle procedure, any Service Mode access and settings it calls for, and its final connection or pressure-reading check. The configuration tools depend on the retrofit: the Continental-to-BLE configuration runs through Toolbox on a laptop connected in the driver’s footwell, while the indirect-to-BLE change is a Service Mode routine.[2][7] Tools named on Tesla’s pages: tire changer, valve core tool, IPA wipes, 11 mm deep socket and torque wrench, wheel balancer, a TPMS service tool for the tool-learn route where that procedure applies, and Toolbox for the Continental-to-BLE configuration.[1][5][6] What shapes a workshop bill is whether the job is four wheels off the bead or one, and whether a configuration change is part of it.
Frequently asked questions
How do you reset the TPMS on a Tesla?
On the 2024 and later Model 3 the documented route is Service Mode, Chassis > TPMS, Erase All TPMS IDs, then a drive above 25 kph (15 mph) until all sensors show as connected.[4] For the Continental-equipped 2017 to 2023 Model 3 applications in Tesla’s drive-learn page, the drive-rail prerequisite and VCFRONT reset apply; do not carry that reset to another model without matching service information.[3]
How do I know whether my Tesla uses BLE TPMS?
The cited procedures do not establish a complete factory-fitment timeline by model, build date and market. They document a BLE retrofit for the 2017 to 2023 Model 3, a Continental Gen 2 module on cars that have one, and indirect-to-BLE retrofits for the Model 3 Standard and Model Y Standard applications they cover.[1][9][7][8] Use the identification method documented for the vehicle before ordering a sensor.
Can I put BLE sensors on an older Model 3 with Continental sensors?
Tesla documents a Continental-to-BLE retrofit for the Model 3 applications covered by its retrofit and configuration pages; confirm the procedure applies to the vehicle before buying four sensors or changing its configuration. The documented retrofit is four new sensors, the configuration changed to Tesla BLE in Toolbox, then the 1 to 3 minute drive above 15 mph and a four-reading check.[1][2] The configuration step is the one a tire shop cannot do with a sensor tool alone.
Do aftermarket BLE sensors work on a Tesla?
Autel sells its MX-Sensor BLE as pre-programmed for Tesla 3, Y, S and X and programmable with its own tools; its page gives specifications but no model years.[12] Tesla’s pages do not address aftermarket sensors. Match the sensor to the car’s configured TPMS type, to the maker’s coverage list, and to the wheel and valve.
Can I mix sensor types or colours on one car?
Tesla’s 2025 and later Model Y retrofit page says the updated black sensor performs the same as the original purple one, that both can be installed on different wheels of the same vehicle, and that the mounting nuts are cross-compatible.[7] That statement covers Tesla’s two BLE sensor versions on that application, not a mix of Continental and BLE sensors, which belong to different configurations.
How tight is the TPMS sensor nut on a Tesla?
The cited 2020 to 2024 Model Y replacement and the 2017 to 2023 Model 3 BLE retrofit specify 8 Nm (5.9 lb-ft).[6][1] The Model Y page also specifies an 11 mm deep socket and lists the nut as reusable; follow the reuse and installation requirements of the actual sensor.[6] The 2012 to 2020 Model S page lists 5 Nm for Baolong sensors and 8 Nm for Continental, so the value follows the sensor, not the badge.[10]