
Checking your oil takes about 90 seconds and is the single most effective thing you can do to extend your engine’s life. Yet most drivers treat it as something that only happens when the change reminder light comes on. The problem with that approach is that your engine doesn’t send a polite notification when it’s a quart low — it just starts wearing faster. Some engines, particularly turbocharged ones, can drop a full quart between checks. The light that does eventually come on is the oil pressure warning, and by then you’re past the “checking” stage.
Quick answer
Check engine oil once a month and before any long trip. Check with the engine off and the car parked on level ground — wait at least 5 minutes after shutting off so oil drains back to the pan. The reading should sit between MIN and MAX on the dipstick. Top up if it’s at or below the MIN mark using the exact viscosity and specification printed on your oil filler cap.
Why it matters
An engine running a quart low doesn’t fail immediately — it runs hotter, the oil film thins out faster under load, and wear rates increase gradually. Running two quarts low on a 5-quart engine means the remaining oil is working 40% harder and cycling through the system 40% faster. Heat and contaminant concentration both rise. Over time, this shortens bearing life, accelerates camshaft wear, and — in turbocharged engines where oil also cools the turbo bearings — can destroy a $1,500 turbocharger that would otherwise have lasted 200,000 miles.
Signs it’s due
- More than 30 days since the last check — this is just the schedule, not a symptom
- You’re about to drive more than 200 miles — check before long trips regardless of last check date
- You own a turbocharged engine, a high-mileage vehicle, or any car known for oil consumption — check every 1,000–2,000 miles
- Oil pressure warning light appears — this is an emergency. Pull over and check immediately.
- Ticking or tapping noise from the engine that wasn’t there before — can indicate low oil pressure reaching the valve train
How to do it
- Park on level ground. Engine off. Wait 5 minutes for oil to drain back into the sump — checking immediately after shutdown gives a falsely low reading.
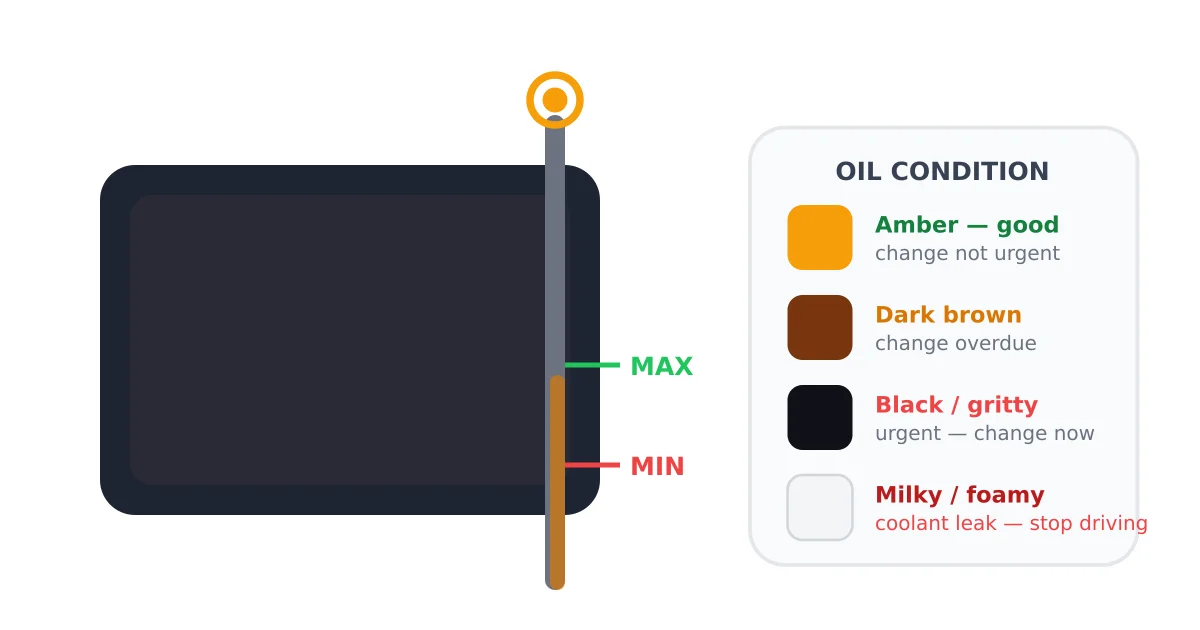
- Open the hood and locate the dipstick — look for a brightly colored ring-shaped handle, usually yellow or orange, near the front or side of the engine.
- Pull the dipstick out completely and wipe it clean with a lint-free rag. Reinsert it fully — you’ll feel it seat at the bottom.
- Pull it out again and hold it horizontally to read the level. The oil film on the stick shows where the level sits. It should be between MIN and MAX — ideally closer to MAX.
- Check the oil condition while you have the dipstick out — rub a small amount between your fingers. Gritty texture means it’s overdue. Milky or foamy appearance means coolant contamination — stop driving and diagnose the cause.
- Top up if needed using the spec on the oil filler cap. Add in half-quart increments, wait a minute, and recheck — overfilling is also harmful.
DIY or shop
- DIY difficulty: Beginner. No tools, no jacking, no mess. Takes 90 seconds once you’ve done it once.
- DIY cost: A quart of the correct oil to keep in the trunk — $8–$15. The check itself is free.
- Shop involvement: None needed for a check. Topping up is something any driver should handle themselves — it’s a basic skill that pays for itself the first time you catch a slow leak before it becomes an expensive repair.