A dash cam is easy to stick on the glass and forget about. Done carelessly, it blocks part of your view, dangles a cable near an airbag, or sits in a spot your state does not allow. Any of those turns a safety device into a hazard or a ticket.
A basic plug-in front-camera install often takes 20 to 40 minutes; hardwire kits and rear cameras take longer. Getting it right means the camera records what you need without sitting in your sightline, and the wiring stays clear of the airbags that protect you in a crash. Most of the risk comes from two choices: where you mount it and how you route the cable.
Here is a checklist to install a dash cam cleanly, legally, and safely, plus what to confirm before you pull out of the driveway.
Quick Safety Answer
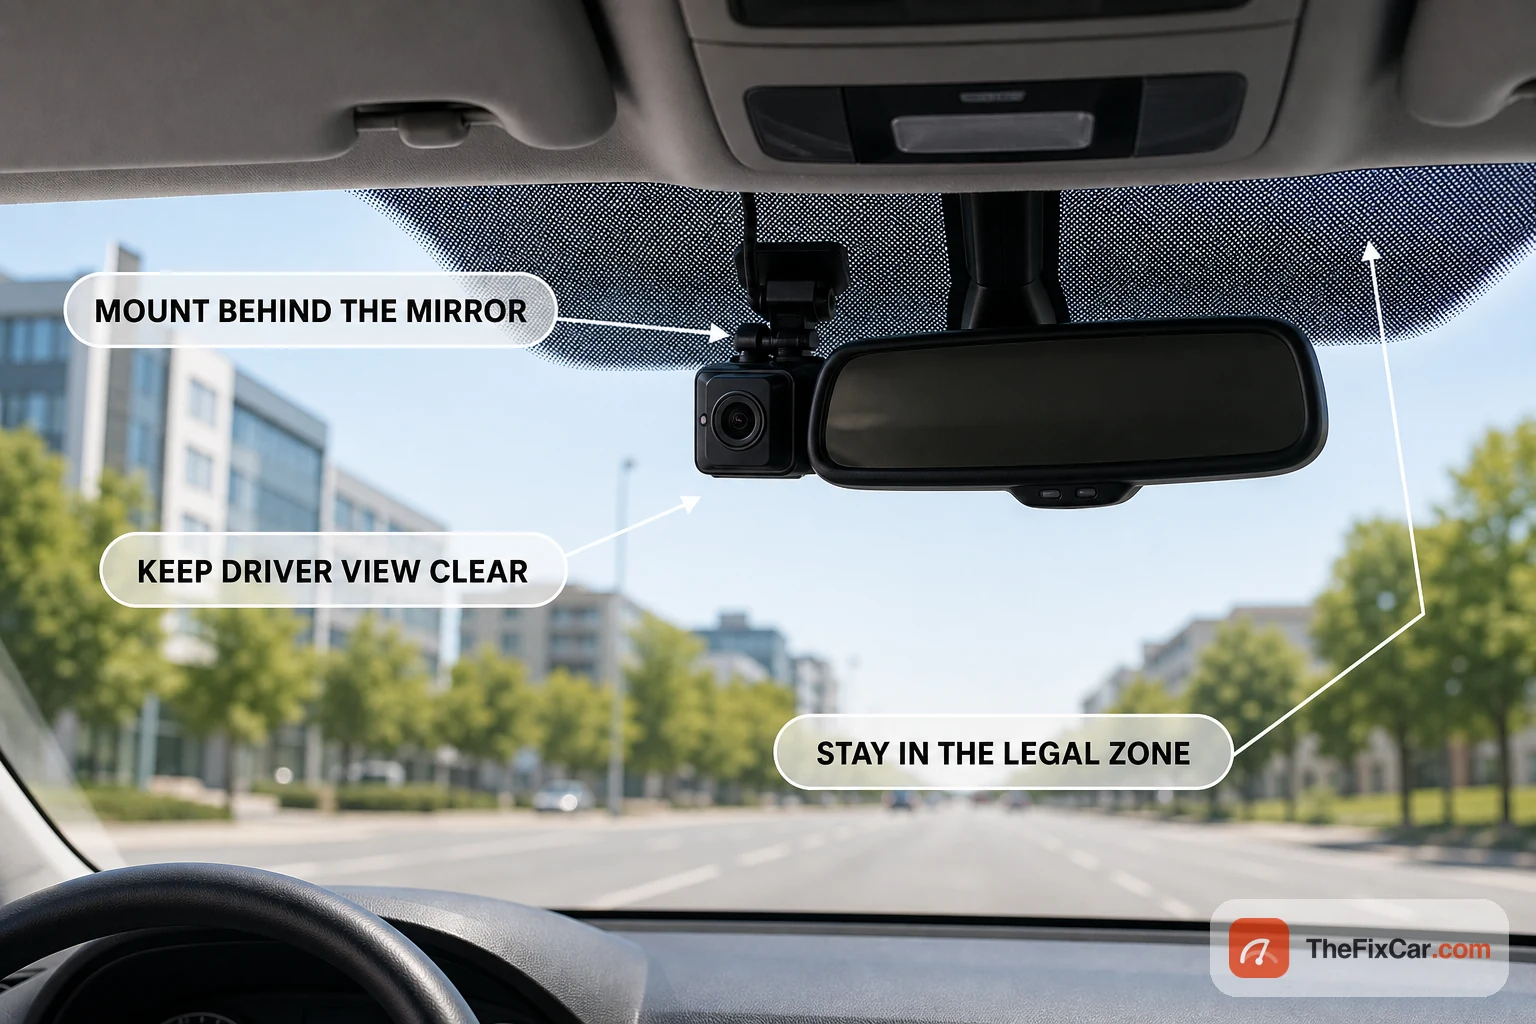
Mount the camera high on the windshield, ideally right behind the rearview mirror, where it stays out of your forward view. Keep it inside your state’s legal zone: California, for example, allows a device of no more than 5 square inches in the upper center or lower driver corner, or 7 square inches in the lower passenger corner, under Vehicle Code 26708. Route the power cable around the headliner only if it stays clear of the curtain-airbag deployment path; do not run it across an airbag cover or behind pillar trim unless the vehicle manual or a professional confirms the safe route. Then test the camera while parked before you drive, so you are not adjusting it in traffic.
Why This Matters
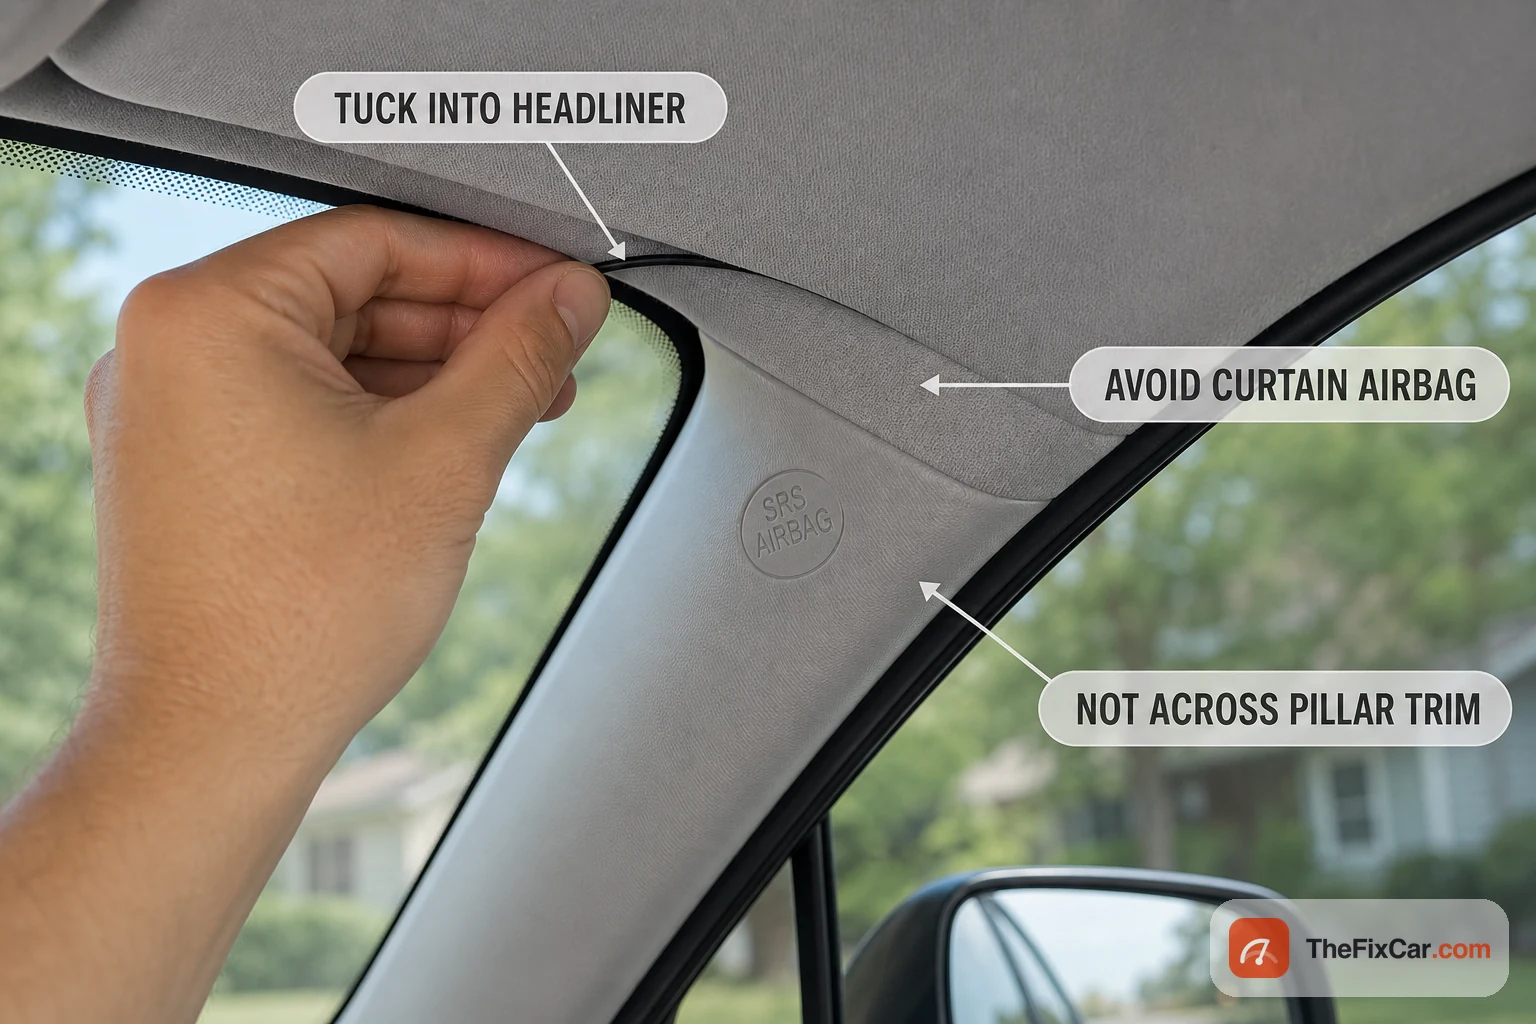
A camera or cable in the wrong place creates two separate problems. The first is visibility: a unit mounted low or in the center of the glass sits in your scan path, and a few square inches of blind spot at highway speed hides a lot of road. The second is the airbag. Curtain airbags deploy from the roof rail along the A and C pillars, and a cable zip-tied to that hardware can become a projectile or keep the bag from unfolding correctly. NHTSA’s airbag guidance is built around keeping the deployment path clear.
There is a legal layer too. Dash cams are generally legal in the U.S., but windshield placement, obstruction, suction-mount, and recording rules vary by state. Getting the spot right once avoids all of it.
Safety Checklist
- Essential: legal placement, clear driver view, cable routed away from airbags, secure mount, tested before driving.
- Better: behind-the-mirror position, level horizon, cable tucked out of sight, audio-consent check.
- Optional: hardwire kit with cutoff for parking mode, rear camera, polarizing filter.
Tools and parts to have ready: dash cam, mount pad or suction mount, alcohol wipe, microfiber cloth, plastic trim tool, cable clips, a 12V adapter or hardwire kit, a low-voltage cutoff for parking mode, add-a-fuse taps, the correct fuse sizes, a fuse puller or needle-nose pliers, a multimeter or fuse tester, and the owner’s manual.
- Pick a legal windshield zone. Behind the rearview mirror is usually the lowest-obstruction spot, but you still need to confirm your state’s windshield-mounting rule before sticking the camera down. If you use a corner, check your state’s size limit and allowed position before you stick anything down.
- Keep the driver’s forward view clear. Sit in your normal driving position and confirm the camera and mount do not intrude on the road, signals, or mirrors. If you notice it while looking ahead, move it higher or tighter to the mirror.
- Mount high, not low. A high mount captures the road with a level horizon and stays above the wiper sweep line dirt collects in. A dashboard mount is a fallback when windshield mounting is restricted, but secure the base so it cannot slide.
- Do not cover factory sensors or camera housings. Many newer vehicles have a windshield-mounted camera, rain sensor, light sensor, or ADAS module near the rearview mirror. Keep the dash cam and its adhesive pad outside that sensor area, and do not block the factory camera’s view through the glass.
- Clean and cure the adhesive. Wipe the glass with alcohol, let it dry, then press the mount firmly. Most adhesive pads hold best if you leave them a few hours before hanging the camera, so it does not drop onto the dash on a hot day.
- Route the cable away from airbags. Tuck the wire into the headliner and down a pillar trim, not across it. Do not run it over or fasten it to a curtain-airbag module. If you cannot tell where the airbag sits, do not route the cable behind pillar trim yourself; have a shop route it.
- Keep the cable off the pedals and controls. The lead to the power source should not hang where it can catch a foot, a knee, or the shifter. Loose wiring near the pedals is a real hazard.
- Choose your power method. A plug into the 12V socket is simplest and fine for recording while you drive. A hardwire kit powers parking mode and hides the cable, but it needs the right fuse and a low-voltage cutoff so it does not drain the battery.
- If you hardwire, pick fuses carefully. Use an add-a-fuse tap only on a non-safety accessory circuit identified in the owner’s manual, such as a 12V outlet or seat-heater circuit when appropriate. Do not tap airbag, ABS, ECU, steering, brake, or driver-assistance fuses. Match the tap and fuse rating to the hardwire-kit instructions, install it in the correct orientation, and ground to bare chassis metal.
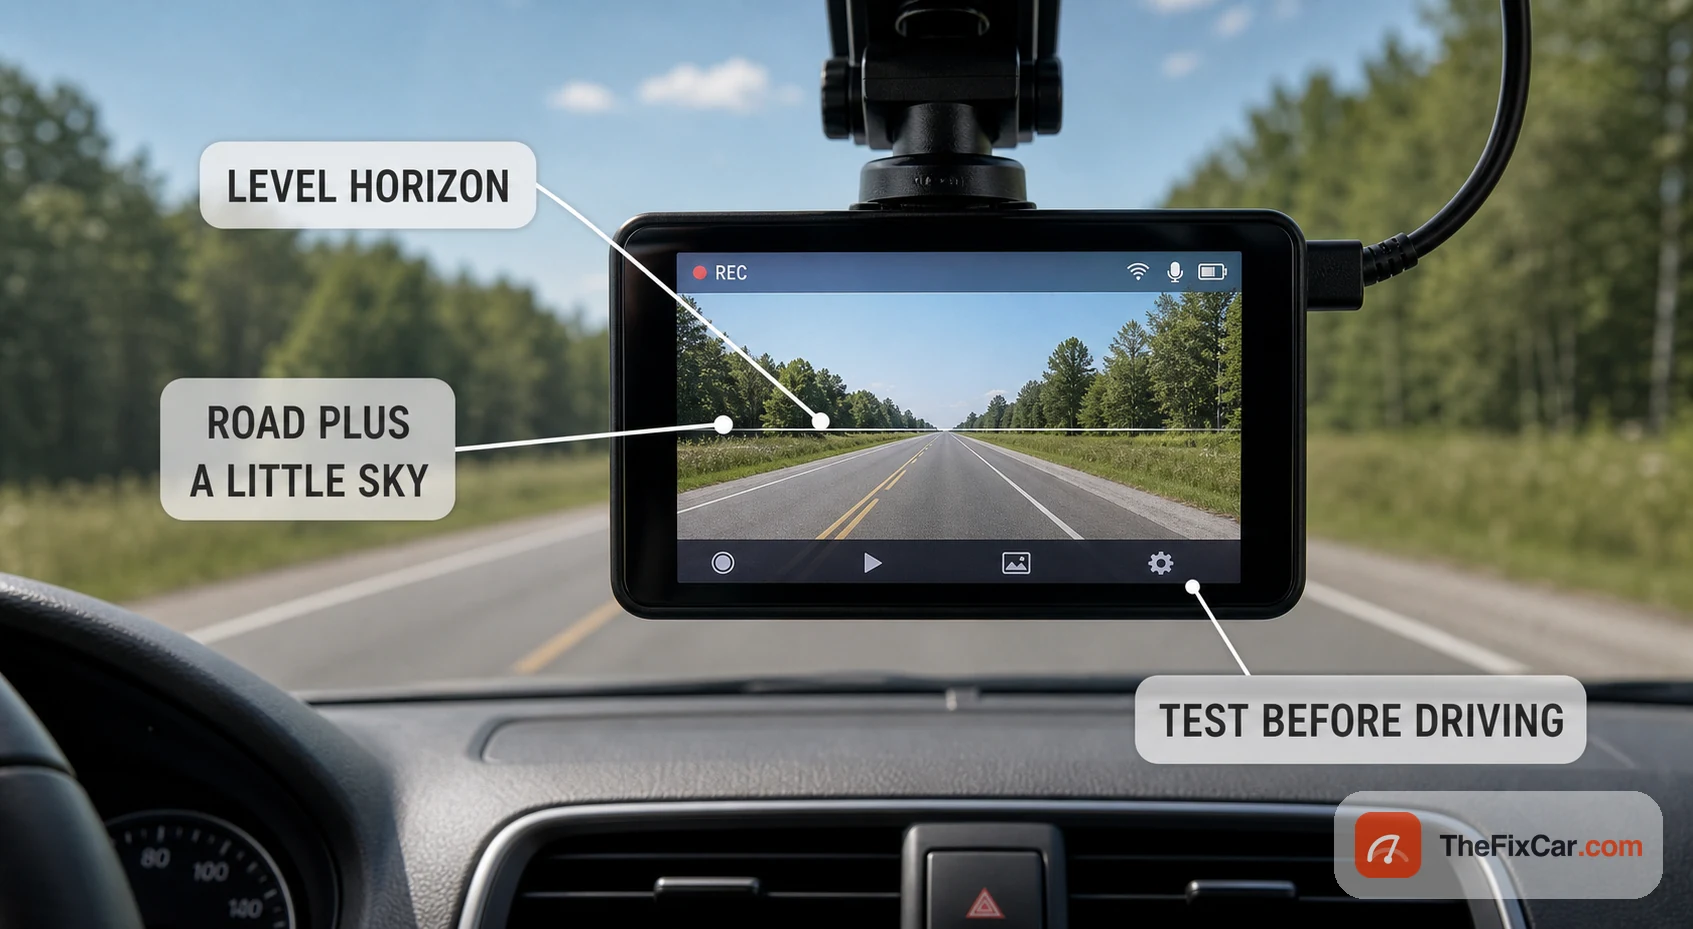
- Set the angle level. Aim so the horizon sits near the middle of the frame, capturing road and a little sky. A camera pointed too low misses signals and signs; too high wastes resolution on the sky.
- Check audio and consent. Some states treat in-cabin audio recording as a two-party-consent situation. If your camera records sound and you carry passengers, know your state’s rule or disable audio.
- Confirm nothing rattles or reflects. A loose mount buzzes and blurs footage; a camera too far from the glass can reflect the dashboard. Reseat it until the image is clean.
- Test everything while parked. Power on, confirm it records, check the framing on the screen or app, and make sure parking mode behaves if you wired one. Do this before the first drive, not on the road.
What To Do Before Driving
- Sit in the driver’s seat and scan the windshield as you normally would. Confirm the camera and mount are not in your view of the road, mirrors, or signals.
- Tug the cable gently along its whole run to make sure it is tucked in and cannot fall toward the pedals or an airbag.
- Power the camera and watch it start recording. Check the live image for level framing and no dashboard reflection.
- If you hardwired it, turn the car off and confirm parking mode starts and the low-voltage cutoff is set for your vehicle. Check your owner’s manual before relying on any fuse tap.
- Set audio on or off based on your state’s consent rule and who rides with you.
- Do a short test drive on a quiet street, then park and review the clip for framing and clarity before you count on it.
When Not To Drive
- Do not drive if the camera or mount sits in your view of the road, signals, or mirrors. Reposition it first.
- Do not drive with the power cable hanging near the pedals, the shifter, or your knees.
- Do not drive if the cable is routed across or fastened to a curtain-airbag module or any airbag cover.
- Do not drive while you are still adjusting angle, settings, or the mount. Finish parked.
- Do not drive with a mount that is loose or sliding; a camera that drops onto the dash is a distraction at the worst moment.
- Do not rely on a windshield placement you know violates your state’s rules; move it to a legal spot before the trip.
Common Mistakes
- Mounting dead center on the glass. It feels like the best angle, but it puts the unit in the driver’s scan path. Behind the mirror gives nearly the same view without the blind spot.
- Zip-tying the cable to pillar hardware. Drivers tidy the wire by anchoring it to whatever is handy, which is often airbag structure. Tuck it into trim instead, and leave airbag hardware alone.
- Trusting the cigarette-lighter socket for parking mode. Many sockets stay live with the key off, so a plug-in camera can keep drawing and flatten the battery with no protection.
- Skipping the size and zone check. A perfectly placed camera can still be illegal if it exceeds your state’s square-inch limit or sits outside the allowed corner.
- Adjusting the camera while driving. Fiddling with framing or settings in motion is exactly the distraction a dash cam is supposed to help you avoid. Pull over.
- Hanging the camera before the adhesive cures. A mount that lets go in the heat drops the camera and the dangling cable into the footwell.
For Driver Education Use
Instructors, fleet trainers, and community safety programs can adapt this checklist for pre-drive setup lessons. Keep the legal-placement, airbag-routing, and parked-testing warnings intact.
FAQ
Where is the safest place to mount a dash cam? High on the windshield, right behind the rearview mirror, is usually the lowest-obstruction spot. It keeps the camera out of your forward view and, on most cars, inside the allowed windshield zone. Confirm your state’s size and placement rule before you stick it down.
Can a dash cam be mounted behind the rearview mirror? Yes, and it is the common recommendation, as long as the camera and adhesive pad do not cover a factory windshield camera, rain sensor, or ADAS module in that area. Keep it clear of those housings and out of the driver’s sightline.
Can dash cam wiring interfere with airbags? It can if you route the cable across or fasten it to a curtain-airbag module or an airbag cover. Tuck the wire into the headliner and pillar trim only where it stays clear of the airbag deployment path, and have a shop route it if you are unsure.