A dead battery strands you fast, and jumper cables are the quickest fix when another vehicle is nearby. Most people reach for them knowing red means positive and black means negative, but the connection sequence itself gets guessed far more often than it gets followed correctly. Getting it wrong doesn’t always cause a disaster, but it can produce a spark close to the battery, and lead-acid batteries release hydrogen gas whenever current flows through them.
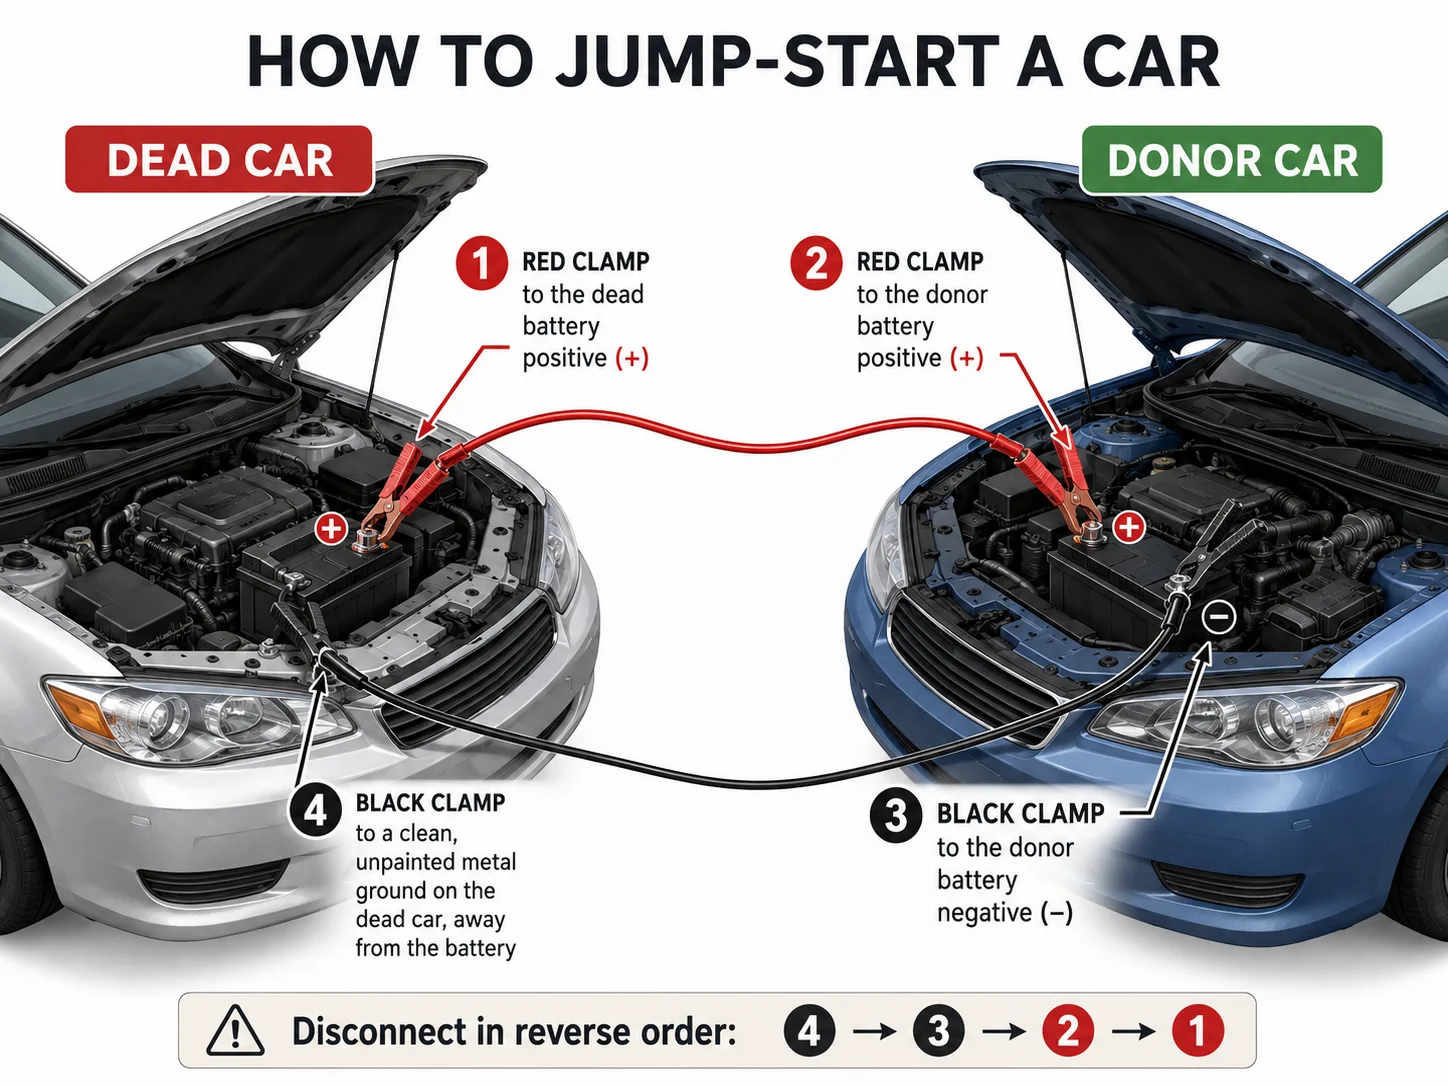
The correct sequence is four steps: red clamp to the dead battery’s positive terminal, red clamp to the donor battery’s positive terminal, black clamp to the donor battery’s negative terminal, then black clamp to an unpainted metal surface on the dead car. Not the dead battery’s negative terminal. That last placement puts any small spark away from the battery vents, which is the whole point of the asymmetry.
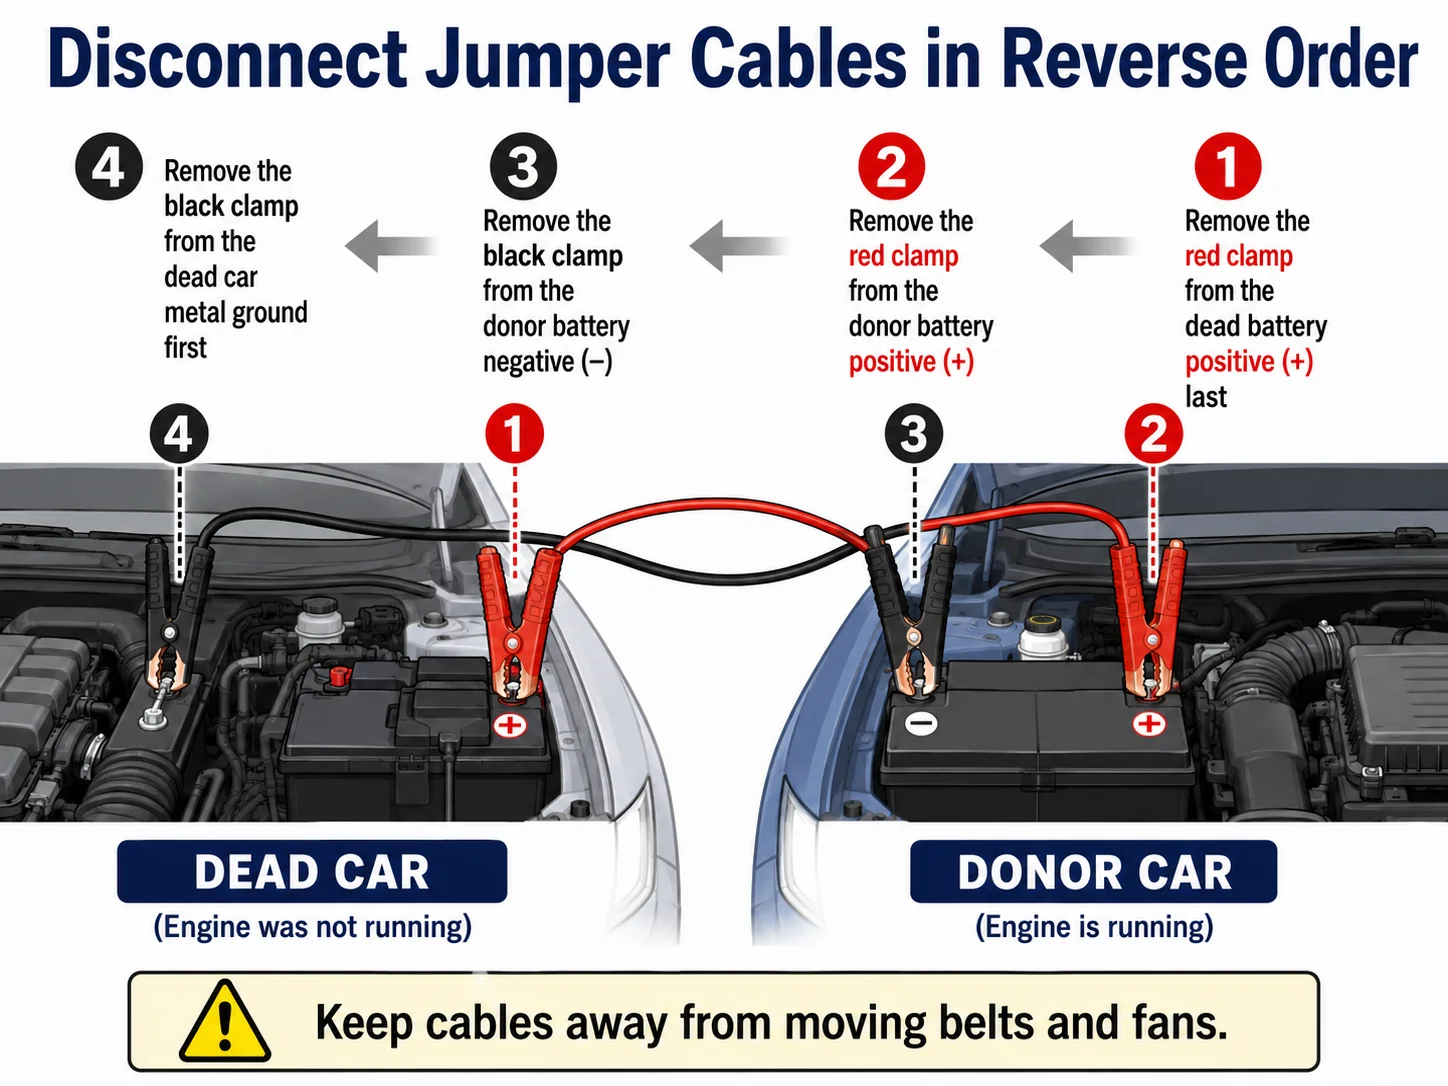
Disconnecting follows the same four steps in reverse. Read on for the full sequence, why each clamp lands where it does, and when to skip the jump entirely and call for a tow.
Quick Safety Answer
Connect the red cable first: one clamp to the positive terminal on the dead battery, the other to the positive terminal on the donor. Connect the black cable third to the donor’s negative terminal, then fourth to an unpainted metal surface on the dead car: a bolt, engine bracket, or metal strut, not the battery terminal. Let the donor run for two to three minutes before attempting to start the dead car. Once the dead car is running, leave both vehicles running and remove the clamps in reverse order. If the dead car starts but stalls within a few minutes, stop driving and call roadside assistance: a battery that won’t hold a charge or an alternator that isn’t charging both require diagnosis, not another jump.
Why This Matters
Lead-acid batteries produce hydrogen gas as a byproduct of charging. A battery that has sat dead for several hours may have accumulated gas near the vent caps. Connecting the final clamp to the battery’s negative terminal creates a spark at the moment the circuit completes, and that spark sits directly above a potentially vented battery. Jump-start injuries serious enough to involve medical treatment are documented every year in the U.S., and many involve acid spray or ruptured battery casings from this scenario. Placing the fourth clamp on metal rather than the terminal moves that spark away from the battery.
Wrong-order connections also risk a voltage transient through the donor car’s alternator or engine control module. Vehicles with multiple control modules (most cars made after 2000) are more sensitive to voltage spikes than older vehicles.
Safety Checklist
| Level | Items |
|---|---|
| Essential | Heavy-duty jumper cables, ideally 12 AWG or thicker for small and midsize vehicles, at least 16 feet long, both vehicles with 12V conventional lead-acid batteries |
| Better | Safety glasses, nitrile or latex gloves, both vehicles off and in park before connecting |
| Optional | Portable lithium jump pack for solo situations, flashlight for low-light work |
- Cables rated for the job. Cables thinner than 12 AWG may overheat during cold-weather starts or when starting larger engines. Check the label for a wire gauge or continuous amperage rating, not just the clamp jaw rating. Clamps rated for 800A on thin 16-gauge wire are common at gas stations and will heat up during a long crank.
- At least 16 feet of cable. Short cables force you to park in hazardous positions, sometimes partly in traffic. Twenty-foot cables cost only slightly more and let you park both vehicles safely to the shoulder.
- Both vehicles in park with engines off. Confirm both cars are in park (or neutral with the brake set for manual transmissions) before touching any clamp. The donor engine starts only after all four clamps are placed.
- Dead battery inspected before connecting. Look for a cracked or bulging casing and check for leaking acid around the base. A visibly damaged battery should not be jump-started.
- Terminals checked for corrosion. White or blue crust on the terminal posts creates resistance. A heavy buildup means the clamp may not pass enough current to crank the engine. Use a wire brush to clear light corrosion before connecting.
- Clamps kept separate after each connection. Once the first red clamp is on the dead battery, the second red clamp must not touch any metal on the dead car. Keep unattached clamps in hand or resting on rubber trim, not draped over the engine bay.
- No open flames or fuel leaks nearby. Do not use jumper cables near a running engine with a visible fuel leak or near a fuel spill. Sparks and fuel vapor are incompatible regardless of cable order.
- Vehicles not touching each other. If the two car bodies make contact, there is a direct current path between frames. Park close enough for the cables to reach but with a few inches of clearance between bumpers.
What To Do Before Driving
Follow these steps in sequence. Reversing any step increases the risk of sparking near the dead battery’s vents.
- Park the donor car so the batteries are within cable reach, with both vehicles in park and engines off. Leave a small gap between bumpers.
- Inspect the dead battery before touching any clamp. A cracked case, swollen sides, or strong sulfur smell means stop here and arrange a tow instead.
- Connect the first red clamp to the positive terminal on the dead battery. The positive terminal is usually marked with a + symbol and often has a red cover. Seat the clamp fully on bare metal, not on any plastic shroud.
- Connect the second red clamp to the positive terminal on the donor battery.
- Connect the first black clamp to the negative terminal on the donor battery.
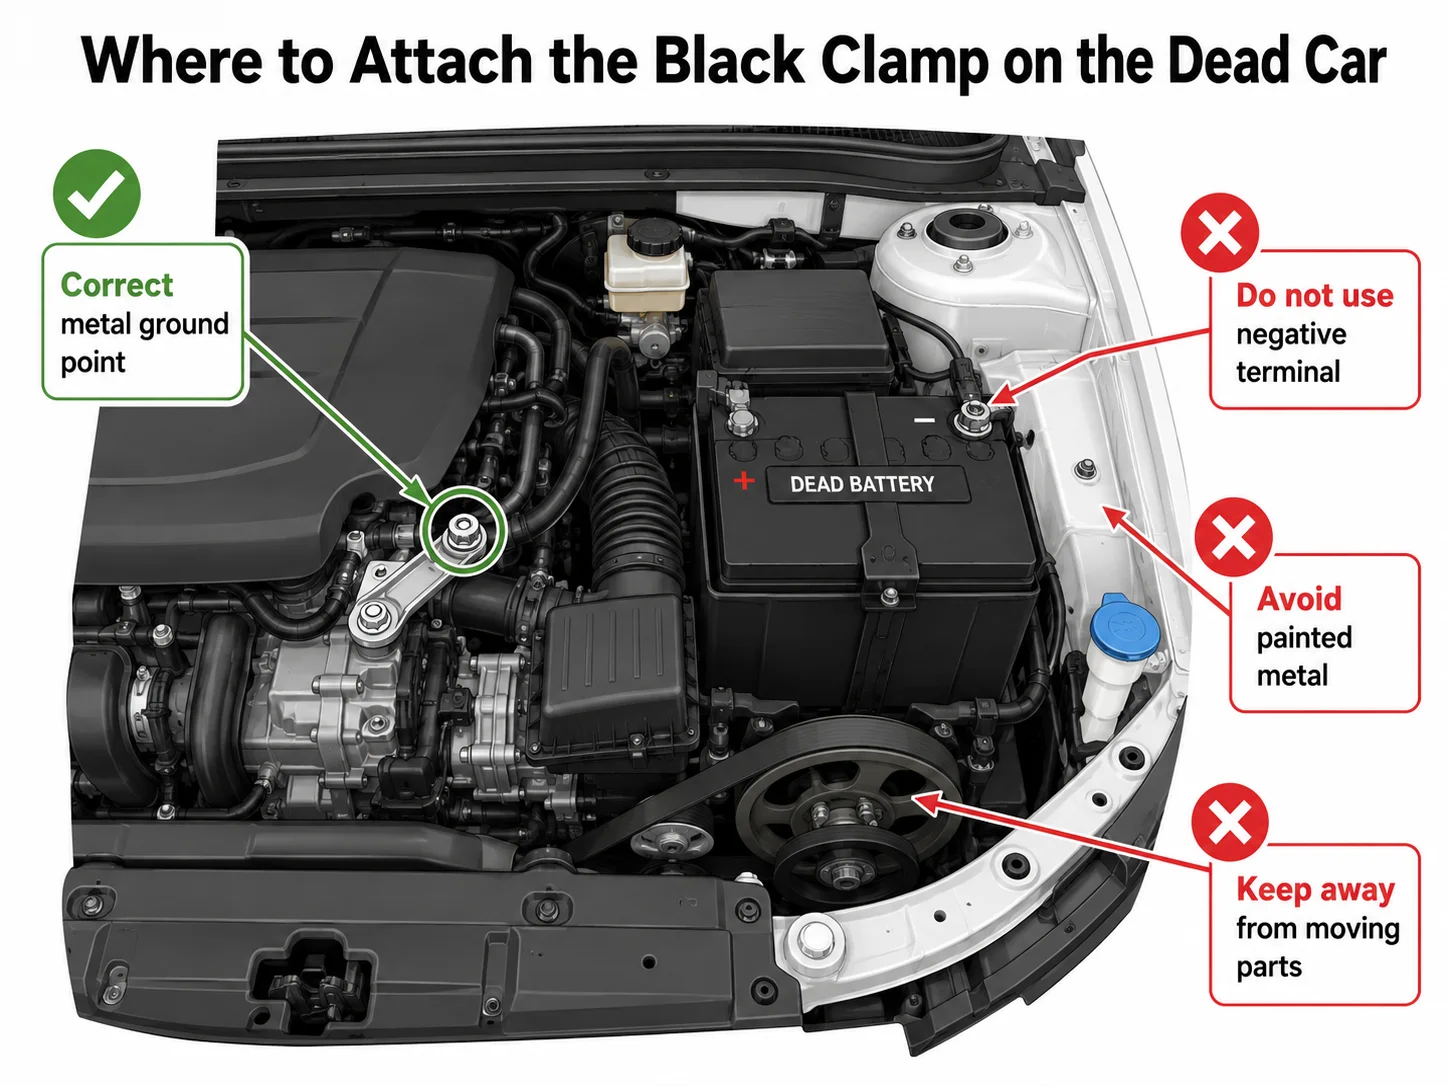
- Connect the second black clamp to an unpainted metal surface on the dead car’s engine bay: a bolt on the engine block, an alternator bracket, or a metal strut tower. Keep this clamp at least 12 inches from the dead battery and away from fuel lines, belts, and plastic parts.
- Start the donor car and let it run for two to three minutes before attempting to start the dead car. Running the donor gives its alternator time to push charge into the dead battery.
- Attempt to start the dead car. If it cranks slowly but starts, keep it running. If it doesn’t start after two tries, wait two more minutes and try once more. Three failed attempts with a good donor connection suggests the battery is too discharged or has a failed cell.
- Once the dead car is running, remove all four clamps in reverse order: black from the metal ground first, black from the donor negative second, red from the donor positive third, red from the previously dead battery last. Keep the clamps from touching each other and from touching any vehicle metal while removing them.
- Drive the jump-started car for at least 20 to 30 minutes if the charging system is healthy. Short city trips with multiple stops, high electrical loads, or a weakened alternator may not be enough to fully recover a deeply discharged battery. If a longer continuous drive isn’t possible, connect a plug-in battery charger overnight.
When Not To Drive
- Do not attempt a jump start if the battery casing is cracked, swollen, or leaking acid. A structurally damaged battery can fail under the current of a jump start.
- Do not attempt a jump start if the battery has frozen. Frozen batteries won’t accept a charge, and forcing current through them can cause the casing to crack further. The vehicle needs to be warmed up first.
- Do not proceed if the battery has a strong smell of rotten eggs before you’ve connected anything. Persistent sulfur odor at rest indicates a failed cell; the battery needs replacement, not a boost.
- Do not drive away if the car stalls within two to three minutes of the cables being removed. A battery that immediately discharges after the jump means either the battery won’t hold a charge or the alternator isn’t charging it. Either problem will strand you again shortly. See Car Starts With a Jump Then Dies for how to tell which one it is.
- Do not continue if the fourth clamp produces sustained heavy arcing when placed on the ground point. A brief small spark at that step is normal. Sustained arcing is not. Disconnect and check whether any clamp is touching the wrong terminal.
- Do not jump start a hybrid or EV’s high-voltage drive battery using standard jumper cables. The 12V auxiliary battery in a hybrid or EV can be jumped using the same four-step procedure, but only from the designated jump start terminals shown in the owner’s manual. High-voltage components must not be approached with standard cables under any circumstances.
- Do not attempt a jump if there is an active fuel leak or a strong fuel smell in the engine bay. Arrange a tow instead.
Common Mistakes
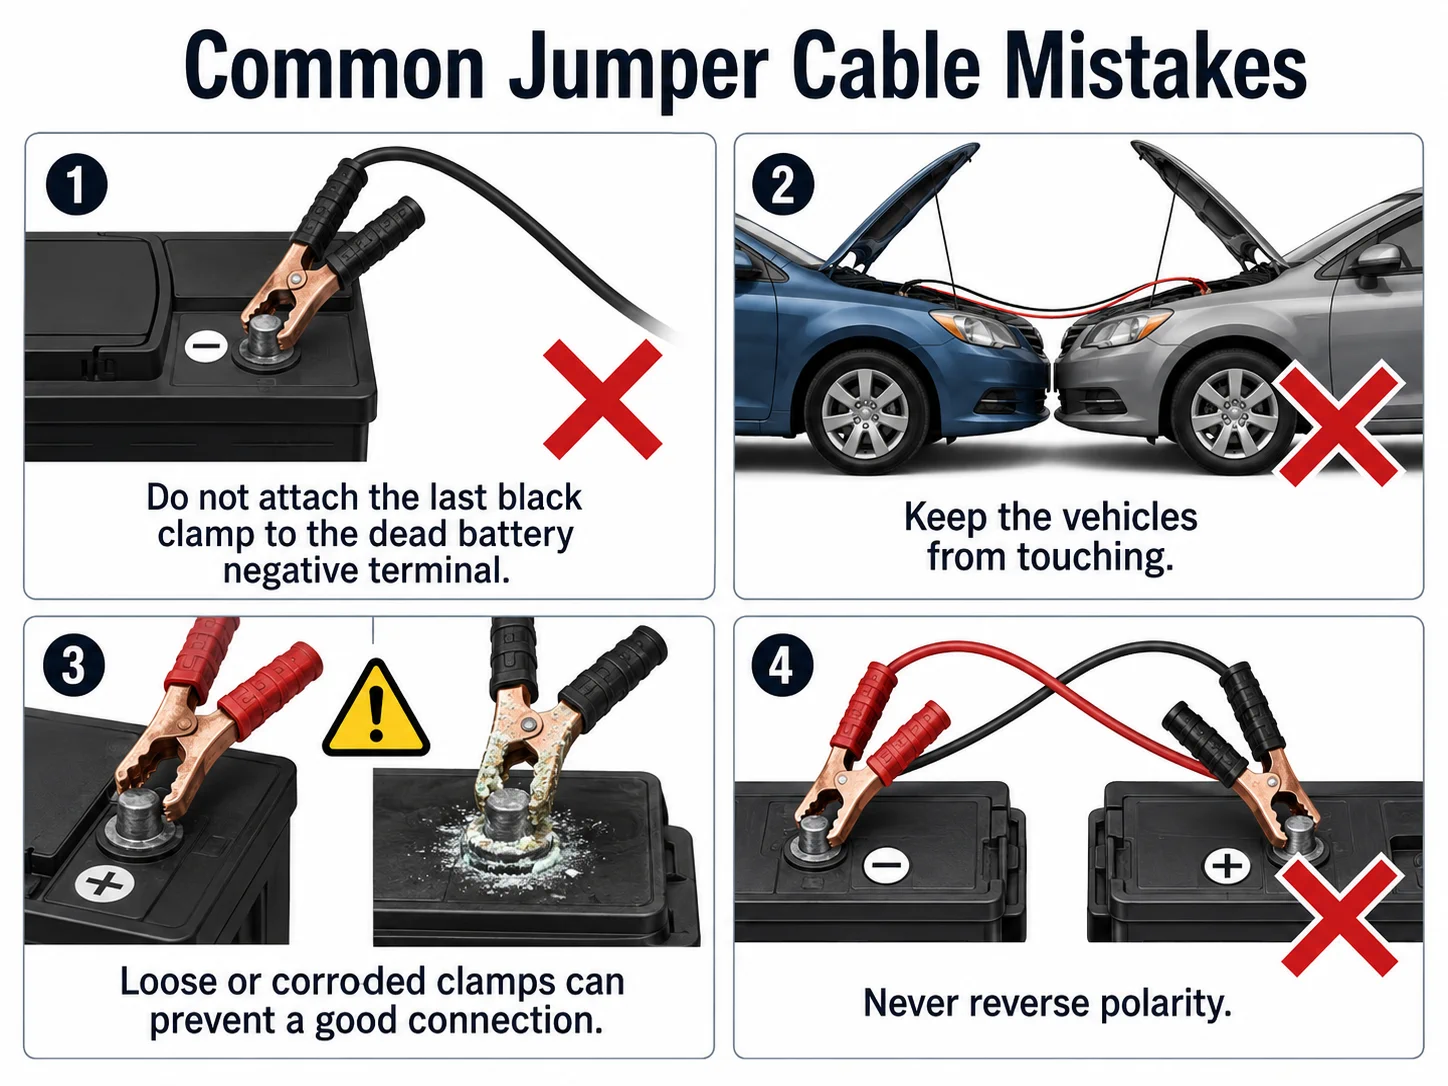
- Connecting the fourth clamp to the dead battery’s negative terminal. The logic seems consistent: one red clamp to each battery, so one black clamp to each battery. The asymmetry is intentional. The ground placement moves the circuit-completing spark away from the battery. Connecting to the terminal puts it directly above the vent caps.
- Letting loose clamps rest on the car body. Once the first red clamp is on the dead battery, an unattached clamp resting on any metal of the dead car completes a partial circuit. Setting the second clamp down on the hood or fender while repositioning creates a short without any obvious warning.
- Not cleaning corroded terminals before connecting. Heavy corrosion resists current flow. When the car doesn’t start, the driver assumes the battery is too far gone, but the clamp never made a good connection. A 30-second scrub with a wire brush often resolves the problem before any real diagnosis is needed.
- Removing cables immediately after the dead car starts. The battery just cranked the engine after being deeply discharged. Its voltage is unstable. Removing the cables right away and then switching off the engine to retrieve belongings can leave the battery too depleted to restart. Keep everything connected for at least a minute after startup.
- Using cables rated for a smaller engine. Cables adequate for a four-cylinder compact can overheat on a large V8 or diesel truck. Cold-start amperage demand on bigger engines is considerably higher. Check the cable’s rated continuous amperage if you’re jumping a heavy vehicle with cables bought for a small car.
- Skipping the owner’s manual on hybrids and EVs. The 12V auxiliary battery in some models is in the trunk or under the floor, and the designated jump start terminals are in the engine bay on a relay or terminal block. Connecting to the wrong point can damage control modules. The diagram check takes two minutes.
What To Keep In The Car
- Jumper cables, 12 AWG or heavier, 20 feet. Look for a continuous amperage rating on the packaging. Cables labeled only with jaw clamp capacity without specifying wire gauge are often too thin for cold-weather starts on larger engines.
- Portable lithium jump pack. A jump pack lets you start a dead car without a second vehicle. Worth carrying for rural travel or situations where finding a helpful driver at night is uncertain. Most units handle two to three start attempts before needing a recharge via USB-C.
- Safety glasses. Battery acid spray from a vented or cracked battery reaches the eyes before you can react. A pair of safety glasses takes almost no space in the cable bag.
- One pair of nitrile gloves. Battery acid is corrosive to skin. Disposable nitrile gloves cost very little and remove the contact risk when handling corroded terminals or battery cable ends.
Notes for EV and Hybrid Owners
Every electric vehicle and plug-in hybrid has a 12V auxiliary battery separate from the high-voltage drive pack. A dead auxiliary battery is what triggers the “no power” condition most often confused with a dead main pack. Jump starting applies only to the 12V auxiliary battery, using the same four-step sequence as on a conventional car. The jump start terminals are in a vehicle-specific location, often in the engine bay on a clearly marked relay or terminal block rather than at the battery itself. Check your owner’s manual for the exact location before connecting. Never connect jumper cables to any orange cable, orange connector, or orange-labeled component, as those carry high-voltage current from the drive battery.
Use This Checklist For
This checklist is useful for new drivers, roadside emergency kits, fleet safety training, winter driving preparation, and driver education lessons. Keep a printed copy with the jumper cables so the connection order does not have to be remembered under stress.
Frequently Asked Questions
Which jumper cable goes on first?
The red cable goes on first. Connect the positive clamp to the dead battery’s positive terminal before touching any other terminal or connection point.
Which jumper cable comes off first?
The last clamp you connected comes off first. Disconnect in exact reverse order: black from the metal ground, black from the donor negative, red from the donor positive, red from the previously dead battery.
Why not connect the black cable to the dead battery’s negative terminal?
Connecting the final clamp to the negative terminal creates a spark at the battery, where hydrogen gas from the dead cell may have accumulated. Connecting to a metal ground point instead moves that spark away from the battery vents.
Is it normal for jumper cables to spark?
A brief, small spark when placing the fourth clamp on the ground point is normal. The circuit completes at that moment. Sustained arcing, or sparking at any of the first three connections, is not normal and means something is connected incorrectly.
Can you jump start a hybrid or electric vehicle?
You can jump start the 12V auxiliary battery in a hybrid or EV using the same four-step procedure, but only from the designated terminals shown in the owner’s manual. Never connect to the high-voltage drive battery or to any orange cable or component.